5 Easy Ways to Make a Professional-Quality LED Light Box at Home

You can make a Professional-Quality LED Light Box at home in several simple ways:
Cardboard box
Plastic bin
Picture frame
Foam board
Acrylic sheet
Each method lets you save money, customize your setup, and learn new skills.
Pick the style that matches your needs and skill level!
Key Takeaways
You can make a great LED light box at home. Use things like cardboard, plastic bins, or acrylic sheets. Pick the way that matches your money and skills.
For the best look, spread the light well. Use white tissue paper or frosted acrylic for this. These things help get rid of strong shadows. They also make the light soft and even.
Try out different LED light colors to make your photos better. Warm lights make things look cozy. Cool lights make things look sharp and pro.
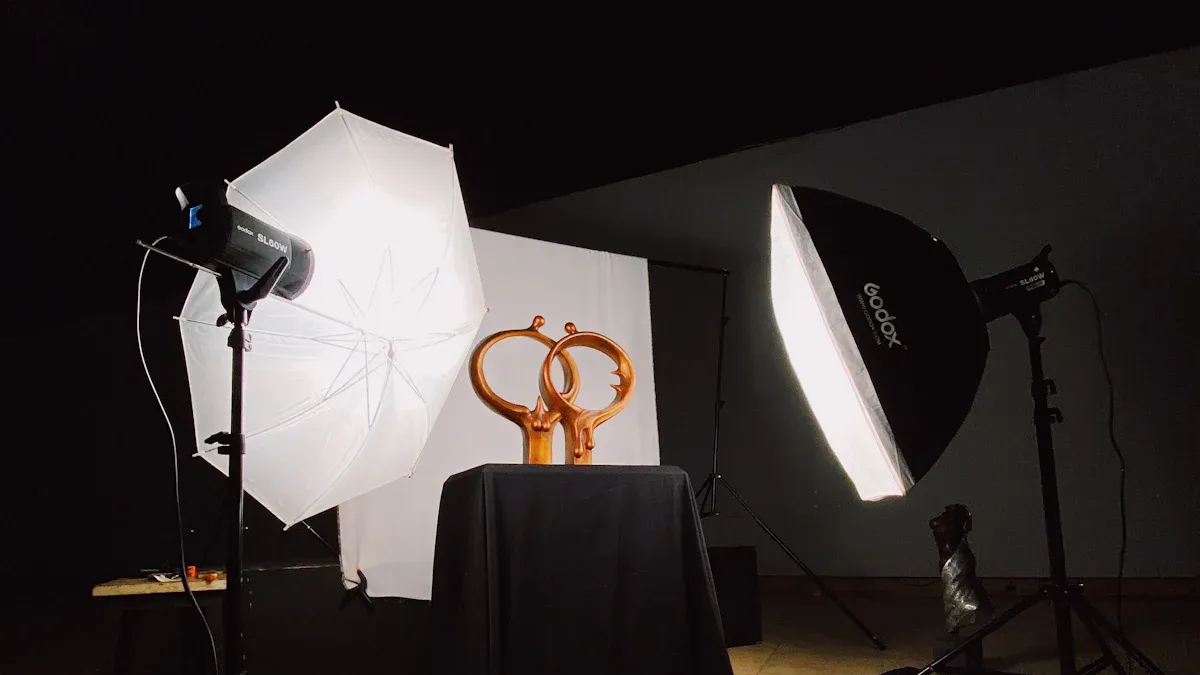
How to Make a Professional-Quality LED Light Box
Cardboard LED Light Box
You want a budget-friendly way to make an led light box? Cardboard is your best friend. You probably have a box at home right now. This method works great for beginners and gives you a professional-quality led light box for almost no money.
Materials Needed:
Cardboard box (medium or large)
White tissue paper or parchment paper
LED strip lights or clamp lights
Scissors or box cutter
Tape or glue
Ruler
Steps:
Cut out large windows on three sides of the box, leaving a 2-inch border for strength.
Tape white tissue or parchment paper over the windows. This diffuses the light.
Reinforce the corners with extra cardboard and glue for stability.
Attach the LED strip inside the box, spacing it evenly for consistent lighting. You can also use clamp lights if you want more brightness.
Place your subject inside and shoot away!
Tip: Line the inside with white poster board for even more light diffusion.
Cost & Time:
Cost: Under $10
Time: A few hours to complete
Material | Durability | Light Diffusion |
|---|---|---|
Cardboard | Budget-friendly, lightweight | Moderate |
Plywood | Sturdy, professional finish | Low |
Acrylic | Durable, sleek look | Superior |
You get a lightweight box that’s easy to move. The light diffusion is moderate, but it’s perfect for most small projects.
Plastic Bin LED Light Box
If you want something a little sturdier, try a clear plastic bin. This method is simple and gives you a professional-quality led light box that’s easy to clean and store.
Materials Needed:
Clear plastic storage bin (choose a size that fits your needs)
4 touch LED lights or an LED strip
White poster board or parchment paper
Tape or glue
AA batteries (if using touch lights)
Steps:
Flip the bin upside down. The bottom becomes your shooting surface.
Line the inside with white poster board or parchment paper for soft, even light.
Attach the LED lights inside the bin, spacing them for even coverage. If you use touch lights, stick one on each side.
Insert batteries if needed.
Place your subject inside and start shooting!
Cost Breakdown:
Clear plastic box/bin: $5–$12
4 touch lights: ~$4
4 AA batteries: $2+
Why choose this method?
You get a sturdy, reusable box for a fraction of the price of store-bought options.
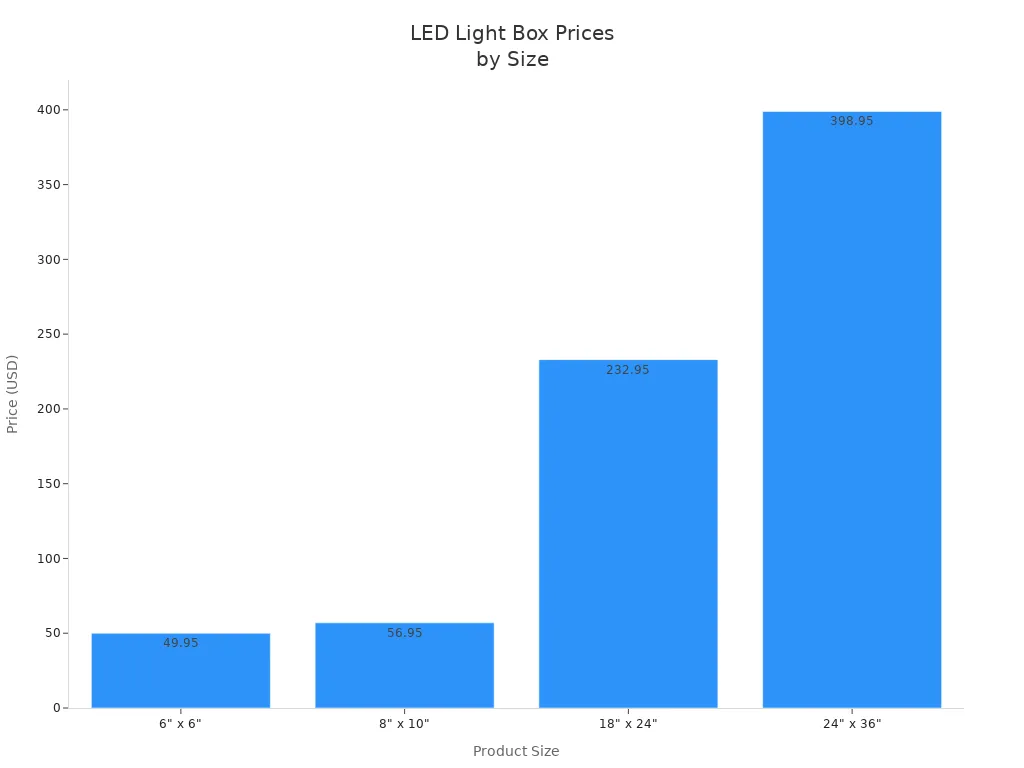
Product Name | Price |
|---|---|
6" x 6" LED Light Box | $49.95 |
8" x 10" LED Light Box | $56.95 |
18" x 24" LED Light Box | $232.95 |
24" x 36" LED Light Box | $398.95 |
Tip: Use a frosted bin for even softer light.
Picture Frame LED Light Box
Want a sleek, professional-quality led light box that looks amazing on your desk? Try the picture frame method. This one takes a little more effort, but the results are worth it.
Materials Needed:
Large picture frame (with glass)
Thin, translucent foam board
Sticky-backed RGB LED strip
E-6000 glue or hot glue
Drill (for cable holes)
Ruler and utility knife
Steps:
Glue the glass pane into the top recess of the frame. Let it cure for a day.
Cut the foam board to fit snugly inside the frame, right against the glass. This will diffuse the light.
Drill small holes for the LED power cable and IR receiver.
Stick the LED strip around the inside walls of the frame, spacing it about an inch apart. Reinforce with hot glue if needed.
Plug in your LED strip and enjoy your new light box!
Pro Tip: Use a dimmable LED strip for more control over brightness.
Lifespan:
LED light boxes last 50,000 to 100,000 hours. That’s about 5 to 10 years of regular use!
Foam Board LED Light Box
If you need something lightweight and portable, foam board is a fantastic choice. You can make an led light box that’s easy to carry to photo shoots or markets.
Materials Needed:
PVC foam board sheets
White tape or hot glue
LED strip lights
White tissue or parchment paper
Ruler and utility knife
Steps:
Cut four foam board panels for the sides and one for the back.
Use miter joints for the corners if you want a clean look. Glue or tape the panels together.
Cut windows in the sides and top, then cover them with tissue or parchment paper.
Attach the LED strip inside, making sure the lights are spaced evenly.
Plug in and start shooting!
Why foam board?
PVC foam board is very lightweight. You can carry your professional-quality led light box anywhere.
Great for mobile setups like tradeshows or pop-up markets.
Tip: Reinforce the corners with extra tape for added strength.
Acrylic Sheet LED Light Box
Looking for the ultimate in style and durability? Acrylic sheets give you a professional-quality led light box with a polished, modern look. You can customize the size and shape to fit your needs.
Materials Needed:
Opal or frosted acrylic sheets (choose your thickness)
Aluminum or wood for the frame
LED strip lights
Glue or screws
Ruler and saw
Recommended Acrylic Thickness:
Thickness in Inches | Min - Max |
|---|---|
0.157" | 0.150-0.165 |
0.236" | 0.224-0.248 |
0.315" | 0.299-0.331 |
0.354" | 0.374-0.413 |
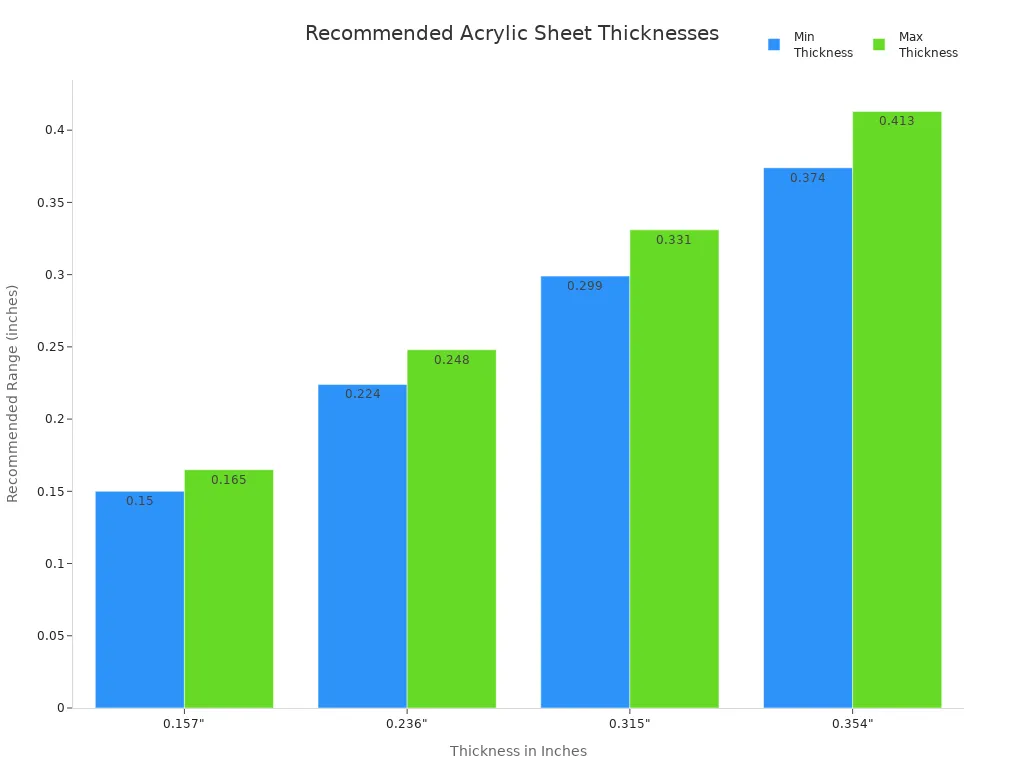
Thicker acrylic diffuses light better, but may reduce brightness a bit. Choose the thickness based on how far your LEDs sit from the sheet and how soft you want the light.
Steps:
Cut the acrylic sheets to size for the sides, top, and bottom.
Build a frame with aluminum or wood. Use glue or screws for strong joints.
Attach the acrylic panels to the frame.
Line the inside with an LED strip, spacing the lights evenly.
Plug in and enjoy a soft, even glow.
Why acrylic?
Acrylic sheets make your display look polished and professional.
You can cut, engrave, or shape them for custom projects.
Frosted acrylic gives a soft, even glow and reduces glare.
Acrylic is lightweight and easy to install.
Pro Tip: Use opal acrylic for the best diffusion and a true professional-quality led light box.
Material Cost Comparison Table:
Material | Cost Range |
|---|---|
Aluminum | $56 - $650 |
Opal Acrylic | $158 - $591 |
Various Finishes | Starting at $69 |
You can see that DIY options like cardboard and plastic bins cost much less than professional materials, but you can still achieve a professional-quality led light box at home.
Make an LED Light Box: Step-by-Step Guide
Materials and Tools
You need the right tools to build a sturdy light box for light box photography. Here’s a quick list to get you started:
Saw – Cut wood or acrylic to size.
Screwdriver – Attach frame pieces.
Drill – Make holes for wires.
Sandpaper – Smooth rough edges.
Ruler or tape measure – Measure your pieces.
Glue or clamps – Hold parts together.
Soldering iron (optional) – Connect led strip wires.
Tip: Use solid wood strips for the frame. Pick one thicker piece so you can slide in the acrylic sheet easily.
Cutting and Assembly
Start by measuring and cutting your panels. Plywood, MDF, or solid wood all work well for the frame. Cut each piece to fit your design. Use glue and screws to attach the frame pieces. Clamps help keep everything tight while the glue dries. Make sure your frame stays square and stable.
Tool | Use |
|---|---|
Saw | Cut wood to size |
Screwdriver | Attach frame pieces |
Drill | Make holes for wires |
Sandpaper | Smooth the wood edges |
Ruler/Tape | Measure your pieces |
Glue/Clamps | Hold parts together |
Soldering Iron | Connect LED wires (optional) |
Reinforce the corners with miter joints and a strong adhesive like flexible 2-part epoxy. This keeps your light box from warping and helps everything stay aligned.
Installing LED Lighting
Attach your led strip along the inside edges of the box. Place the strip far from the front acrylic sheet for even light. For light box photography, plan your lighting so you get 400-600 lumens per square foot. Use foam tape to secure the strip and keep wires neat with zip ties. If you want more control, try adjustable beam angles to direct the light.
Diffusion Techniques
Soft, even light is key for great light box photography. Try these popular diffusion tricks:
Parchment paper: Handles heat and clips on easily.
Frosted shower curtain: Covers large areas for soft light.
White bed sheet or sheers: Simple and effective.
Laser-cut acrylic: Gives a smooth, professional look.
Line the inside of your box with white material. This reflects and spreads the light, reducing hot spots and making your led strip shine evenly. You’ll get soft, beautiful results every time.
LED Light Box Comparison

Difficulty
Pick a project that fits your skills. Cardboard and plastic bin light boxes are the easiest to make. You can finish them in just one afternoon. You only need simple tools for these. Foam board takes more time because you must cut panels. You also need to line up the edges carefully. Picture frame and acrylic sheet boxes are harder. You will need to measure, cut, and sometimes drill holes. If you want a challenge, try the acrylic sheet method. It feels great to finish a tough project.
Tip: If you are new to DIY, start with cardboard or a plastic bin. You will feel more confident quickly!
Cost
Let’s talk about how much you will spend. Cardboard and plastic bin boxes are the cheapest. You can make one for less than $15. Foam board is still not expensive, usually under $25. Picture frame and acrylic sheet boxes cost more money. You might spend $40–$100, depending on what you use. Acrylic is the priciest but looks the best if you want a fancy style.
Method | Approximate Cost |
|---|---|
Cardboard | $5–$10 |
Plastic Bin | $10–$15 |
Foam Board | $15–$25 |
Picture Frame | $30–$60 |
Acrylic Sheet | $50–$100+ |
Quality
You want your photos to look really good. Here is how each method compares:
Kit Type | Key Features | User Feedback |
|---|---|---|
Budget-Friendly | Basic setups, affordable | Good for beginners, limited features |
Mid-Range | Adjustable settings, enhanced color options | Positive reviews for versatility |
Premium | Superior durability, extensive customization | Highly rated for professional displays |
Cardboard and plastic bins work well for easy projects. Foam board and picture frame boxes give better light and more control. Acrylic sheet boxes look cool and give the softest, most even light. If you want your photos to look professional, pick the premium options. You will see a big difference in your pictures.
Pro Tips for Professional-Quality LED Light Box
Lighting Diffusion
You want your diy light box to give you soft, even lighting for product photography. Try using a silver automotive sunshade for the sides of your diy box. Cut the sunshade to fit, then tape the pieces together. This helps bounce the lighting around inside. For the front, use a sheer drapery liner or white parchment paper as a diffuser. Clip it on with small binder clips. This setup spreads the lighting and removes harsh shadows. Your diy projects will look much more professional, and your product photography will pop.
Tip: Always check for hot spots. Move your led strips or panels farther from the diffuser if you see bright spots.
Color Temperature
Color temperature changes how your products look in photos. If you use warmer leds, around 3000K, your diy light box will give a cozy, yellow glow. Cooler leds, like 6000K or 7000K, make your lighting look crisp and blue. This can change the mood of your product photography. Try different settings to see what works best for your diy setup. You want your lighting to match the style of your products and keep colors true.
Finishing Touches
You can make your diy light box look even more professional with a few simple upgrades:
Use daylight-balanced bulbs (5000K–6500K) for natural lighting.
Add advanced led panels or ring lights for more control over your diy lighting.
Try colored backdrops to match your product photography style.
Place a rotating platform inside for cool 360° shots.
These finishing touches help your diy light box stand out. Your lighting will look clean, and your product photography will shine.
You have five easy ways to build a pro-quality LED light box at home. Each method fits different needs and budgets. Watch out for uneven lighting or wrinkled backgrounds. Try new ideas and share your results. Your feedback inspires others and helps everyone solve common DIY challenges together!
FAQ
How do you get the best lighting for diy light box photography?
You want soft, even lighting. Place your strip lights along the sides. Use white paper or fabric inside your diy light box. This helps your photography look professional.
Can you use a diy light box for home photography studio projects?
Yes! A diy light box works great for your home photography studio. You can use it for product photography, crafts, or any small project. Try different strip placements for best results.
How to use a light box for photography with LED strip lights?
Set up your diy light box. Place your subject inside. Turn on your strip lights. Move your camera close. Take photos from different angles. Your photography will look amazing.
See Also
5 Innovative DIY Acrylic Light Box Projects For Your Home
Discover The 5 Best LED Acrylic Light Box Designs For 2025
Key Components For Achieving Professional Acrylic Light Box Quality
Benefits Of Selecting DIY Acrylic Light Box Kits
10 Unique Applications For Illuminated Acrylic Boxes In Design
