Photo Studio Boxes with LED Lighting

Photo Studio Boxes help you take better pictures. The lighting is soft and easy to control. This makes your photos look clear and sharp. LED lights inside these boxes have many good points.
Advantage | LED Lighting | Traditional Lighting |
|---|---|---|
Heat Production | Makes very little heat | Makes a lot of heat |
Energy Efficiency | Uses more energy | |
Color Temperature | Can change to look like sunlight | Stays the same color |
You can use these boxes if you are new to photos. You can also use them if you have taken photos for a long time. They stay cool, save power, and show real colors. Do you want to learn how to choose and use the best box? You are in the right spot!
Key Takeaways
Photo Studio Boxes help you take better pictures. They use soft LED lights that you can adjust. These lights make shadows less strong and help your photos look clear.
Pick a box size that fits what you want to photograph. Small boxes are good for jewelry. Big boxes are better for things like shoes.
Find LED lights with high CRI ratings. This helps your photos show colors the right way. Your pictures will look more real.
Photo Studio Boxes are easy to carry and set up. You can take great photos anywhere. This saves you time and work.
Try different backgrounds and lighting settings. This helps you find what looks best. Your subject will stand out more.
What Are Photo Studio Boxes?

Photo Studio Boxes give you a simple way to take great photos. You can use them at home, in your office, or even on the go. These boxes create a small space where you control the light and background. This helps you get clear, bright pictures every time.
Core Components
When you open a photo studio box, you will find several important parts that help you take better photos:
Softboxes shape and soften the light. They make your subject look smooth and bright.
Umbrellas reflect light. They spread the light out, so you do not get harsh shadows.
Diffusers or scrims change the light. They make it softer or less bright.
Clamps hold things in place. You can use them for backdrops or reflectors.
Light stands support your lights. They keep everything steady.
Backgrounds or backdrops sit behind your subject. You can pick different colors or materials.
Tip: Try different backgrounds to see which one makes your subject stand out the most!
LED Lighting Features
LED lighting is the heart of most Photo Studio Boxes. You get steady, bright light that does not get hot. Many boxes let you adjust the brightness. Some even let you change the color of the light to match daylight or a warmer look. LED lights use less power, so you can shoot for hours without worry. You will also notice that LED lights show colors more accurately, which is great for product photos or art.
If you want soft, even lighting, look for boxes with built-in diffusers or adjustable LED strips. These features help you avoid harsh shadows and make your photos look professional.
Benefits of Photo Studio Boxes
Consistent Lighting
You want your photos to look the same every time. Photo Studio Boxes help you do that. The LED lights inside give you steady, bright light. You do not have to worry about shadows or dark spots. Many users say the dual LED lighting strips are very bright and make the light even. This is great for taking pictures of products or small items.
Dual LED strips give you shadowless lighting.
The light stays the same, so your photos look clear and sharp.
Many people say the LED lighting is the best part of these boxes.
You also get better color in your photos. High CRI (Color Rendering Index) LED lights, like those from FOSITAN with CRI 95+, show colors just like natural daylight. This is important if you want your photos to look real.
High CRI lights show colors more faithfully.
You can see the true color of your subject.
Low CRI lights can make colors look strange.
"The CRI is a value from 0 to 100 that indicates how faithfully a light source renders colors compared to a natural reference. The higher the CRI, the more realistic the color perception."
Dimmable daylight LEDs and diffusion panels help you control the light. You can make the light softer or brighter. This helps you avoid harsh spots and makes your photos look smooth.
Dimmable LEDs let you change the brightness and color.
Diffusion panels spread the light for a soft look.
You can create different effects with these features.
Portability and Setup
You do not need a big studio to take great photos. Photo Studio Boxes are easy to move and set up. Some, like the Amazon Basics Portable Foldable Photo Studio Box, are light and fold up small. You can carry them anywhere. This is perfect if you need to take photos in different places.
The box weighs about 14 pounds. It pops up fast, so you can start shooting in seconds. You do not waste time setting up. This makes your work easier, especially if you take photos for your business or as a hobby.
You can use these boxes at home, in your office, or even outside. The quick setup means you spend more time taking photos and less time getting ready.
Versatility
Photo Studio Boxes come in many sizes and prices. You can find a small box for jewelry or a big one for art prints. Here is a table to help you see the options:
Size | Use Case |
|---|---|
4x6 | Great for standard prints, photo albums, and small frames. |
5x7 | Good for display in glass photo boxes and for personal gifts. |
24x24 | Best for large art prints or wall displays. |
You can also choose from many price points and features. Some boxes are basic, while others have special kits for jewelry or extra lights. Take a look at this table:
Product Name | Price | Features Description |
|---|---|---|
MyStudio® MS20 Light Box Photo Studio Kit | $279.00 | Basic model |
MyStudio® MS20CYC Seamless Background | $89.95 | B-Stock, basic features |
MyStudio® MS20J Lightbox with Jewelry Kit | $339.00 | Specialized for jewelry |
MyStudio® MS32 Light Box Photo Studio Kit | $499.00 | Larger size, more features |
MyStudio® AL1 Single Bulb LED Accent Light | $159.95 | Additional lighting option |
MyStudio® AL2 Dual Bulb LED Accent Light | $199.95 | Enhanced lighting option |
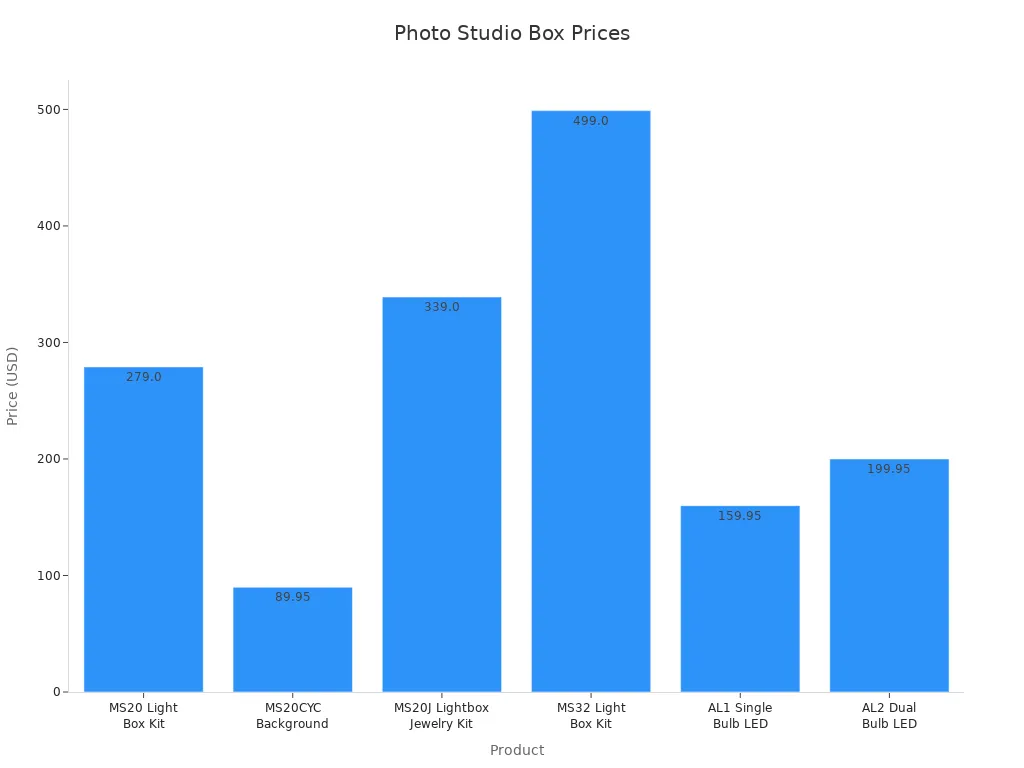
You can pick a box that fits your needs and your budget. Some boxes have dimmable daylight LEDs and diffusion panels. These features let you change the light for different looks. You can use the same box for many types of photos, from products to art.
Tip: Try different sizes and features to see what works best for your style!
Choosing Photo Studio Boxes
Picking the right photo studio box can feel tricky, but you can make it simple by focusing on a few key things. Let’s break down what you should look for so you get the best results every time you shoot.
Size Options
First, think about what you want to photograph. The size of your photo studio box matters a lot. If you plan to shoot small items like rings or USB drives, a 12-inch cube works well. For bigger things, like shoes or small appliances, you’ll want a box that’s at least 24 inches or more. Here’s a quick table to help you decide:
Size Option | Description | Usability Impact |
|---|---|---|
12" cube | Good for small items like jewelry or gadgets | Not enough space for larger products |
24"+ box | Fits shoes, bags, or small appliances | More flexible for different product sizes |
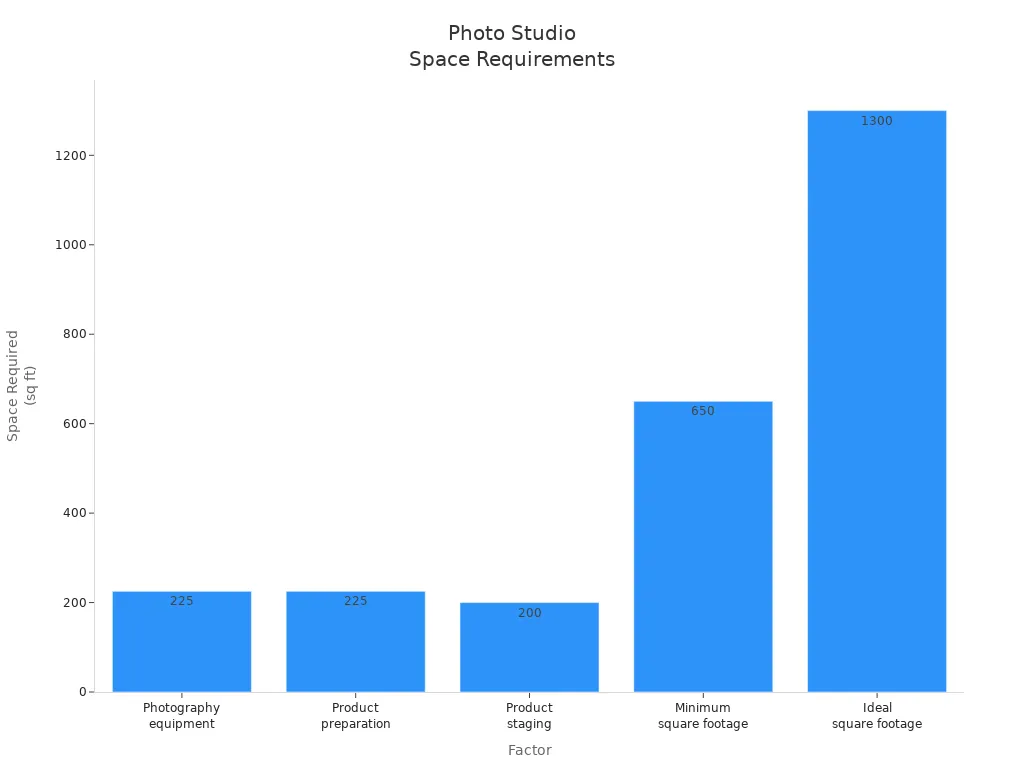
You also need to think about the space where you’ll set up your box. If you have a lot of equipment or need room to move around, you’ll want more space. Check out this table for some ideas:
Factor | Space Required |
|---|---|
Photography equipment | 15’ x 15’ (225 sq ft) |
Product preparation | 15’ x 15’ (225 sq ft) |
Product staging | 20’ x 10’ (200 sq ft) |
Minimum square footage | 650 sq ft |
Ideal square footage | 1,300 sq ft |
If you move around a lot or shoot in different places, look for foldable and portable designs. These boxes pop up quickly, pack down small, and are easy to carry. You can set up anywhere without a hassle.
Tip: Always measure your biggest item before you buy a box. That way, you won’t run out of space when you need it most!
LED Brightness & Color Temperature
The lights inside your box make a huge difference. You want LEDs that are bright and let you adjust the color temperature. High CRI (Color Rendering Index) and TLCI ratings (95+) mean your photos will show true colors. This is super important if you sell products online and want your customers to see the real thing.
Modern LED systems let you change the color temperature from warm to cool. You can make your photos look cozy or crisp, depending on what you need. This flexibility helps you match the lighting to your subject and style. You also save time editing because your photos look great right out of the camera.
LED lights use less energy and stay cool, so you can shoot for longer without worrying about overheating. You can also adjust the brightness to get just the right look. This helps you create different moods and effects, whether you want soft shadows or a bright, clean shot.
Some boxes come with integrated LED strips or ring lights. These features give you even, shadow-free lighting. Ring lights work great for portraits because they light up faces evenly. LED strips spread light across the whole box, making your products look their best.
Ring lights give you soft, even light for faces and small items.
LED strips provide bright, even lighting for all kinds of products.
Both options let you adjust brightness and color for perfect results.
Build Quality & Features
You want your photo studio box to last and work well every time. Look for sturdy materials and strong zippers or fasteners. Foldable boxes are handy if you need to store them or take them on the go. Portable designs make it easy to move your setup from place to place.
Reflective interiors are a big plus. They bounce light around inside the box, so every part of your subject gets lit up. This helps you avoid harsh shadows and makes your photos look smooth and professional.
You get fewer shadows and more control over how your photos look.
Your subject stands out with soft, balanced lighting.
Don’t forget about backgrounds and diffusers. Clean, simple backgrounds like white poster boards or lightboxes work well for most shots. You can also try grass mats, printed designs, or even an LCD TV for cool effects. For diffusers, use translucent materials to soften the light and avoid harsh spots.
Note: Try different backgrounds and diffusers to see what makes your subject pop. You might be surprised by what works best!
When you pick a photo studio box, think about what you need most—size, lighting, portability, or special features. With the right box, you’ll get great photos every time.
How to Use Photo Studio Boxes
Setup
Getting started with your photo studio box is easy. Just follow these steps for the best results:
Start with one light source. This helps you see where shadows fall.
Place your key light at a 45-degree angle to your subject. This gives you nice highlights and soft shadows.
Add a fill light if you want to make shadows softer. Keep this light less bright than your key light.
Use a background light behind or beside your subject. This makes your subject stand out from the background.
Fine-tune your setup with reflectors or diffusers. These tools help you control how soft or strong the light looks.
Tip: Always set up your box on a steady surface so nothing moves while you shoot.
Subject Positioning
How you place your subject changes the look of your photo. Try these ideas:
For Rembrandt lighting, put your key light at a 45° angle to the camera. You’ll see a triangle of light on your subject’s cheek.
For loop lighting, move the light so the nose shadow does not touch the cheek.
For butterfly lighting, put the light right above your subject’s head. This creates a butterfly-shaped shadow under the nose.
Add a fill light to soften shadows. Adjust its brightness to match your key light.
Use a rim light behind your subject. This helps separate them from dark backgrounds.
Try a three-light setup by adding a background light. This can make cool gradients behind your subject.
Try moving your subject closer or farther from the light to see what looks best.
Lighting Adjustment
You want your photos to look clear and bright. Here’s how to adjust your LED lighting:
If your photo looks too bright, lower the light intensity. Overexposed photos lose details and colors.
If your photo looks too dark, increase the light or move your subject closer. Underexposed photos hide important features.
Use diffusers or softboxes to spread the light evenly. This helps you avoid harsh shadows.
When natural light is not enough, use your adjustable LED lights for better control.
Note: Small changes in light can make a big difference in your final photo.
Camera Settings
Now, set your camera for the best shot:
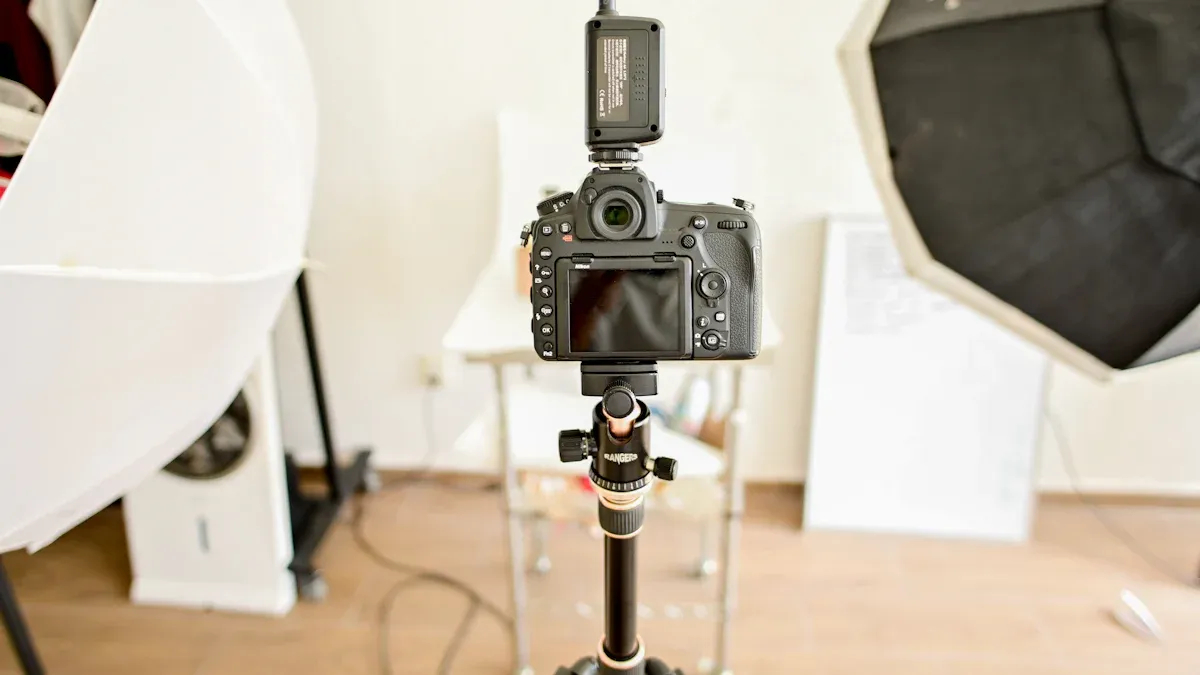
Use a tripod to keep your camera steady.
Set your camera to auto mode if you’re new. This helps you get started fast.
For more control, try manual mode. Adjust the ISO, shutter speed, and aperture to match your lighting.
Check your exposure. If the photo looks too bright or dark, change your settings or adjust the lights.
Take a test shot and review it. Make small changes until you like what you see.
Photo Studio Boxes make it easy to get great results. With a little practice, you’ll find the setup that works best for you.
Common Mistakes
Even with a good photo studio box, you might run into some common problems. Don’t worry! You can fix most of them with a few simple changes.
Exposure Issues
Getting the right exposure can be tricky. Here are some problems you might see and how to fix them:
Whites That Aren’t White: Sometimes your camera makes white things look gray. Try adjusting the exposure compensation to make whites look bright again.
Knocking the Dials: You might bump your camera and change the settings by accident. Lock your exposure settings or check them before you start shooting.
Leaving Your Camera on Spot Metering: Spot metering only checks a small part of your photo. This can make the rest of your picture too dark or too bright. Switch to a different metering mode for better results.
Underexposed Foregrounds in Outside Shots: If you shoot near a window or outside, the sky can look bright but your subject looks dark. Use a graduated ND filter to balance the light.
Not Watching Shutter Speed: Slow shutter speeds can make your photos blurry. Raise your ISO to get a faster shutter speed and sharper pictures.
Changing the Exposure Mode: Accidentally switching modes can mess up your exposure. Always double-check your mode dial before you start.
Underexposed Backlit Subjects: If your subject has light behind them, they might look too dark. Try center-weighted metering to help your camera expose the subject better.
Tip: Take a test shot and check your camera’s screen before you start your real shoot. This helps you catch exposure problems early!
Shadows & Reflections
Shadows and reflections can sneak into your photos and ruin a great shot. You might see harsh shadows if your lights are too close or not diffused. Try moving your lights farther away or use a diffuser to soften the light. If you see reflections, especially on shiny objects, change the angle of your lights or your camera. Sometimes, a small shift makes a big difference.
Use softboxes or diffusion panels to spread the light.
Move your subject or lights to avoid unwanted reflections.
Watch for shadows under your product and adjust as needed.
Background Selection
Picking the right background helps your subject stand out. The wrong background can distract from your product or make your photo look messy. Here’s a quick guide to help you choose:
Criteria | Description |
|---|---|
Size | Affects how easy it is to move, store, and use your background. Bigger backgrounds give you more options. |
Material | Changes how your photo feels. Paper, muslin, vinyl, and fabric all look different and have different strengths. |
Texture | Sets the mood. Smooth backgrounds look clean, while textured ones add interest. |
Setup | Some backgrounds are easy to hang or fold. Others need stands or mounts. Pick what fits your space and workflow. |
Note: Try different backgrounds to see which one makes your product pop. Sometimes a simple white or black background works best!
Photo studio boxes with LED lighting help your pictures look better. They also save you time when you take photos. These boxes use less energy, so you spend less money. The lights last a long time and do not need much fixing. LED lights do not get hot, so your workspace stays cool. You can change the color settings to show real colors in your photos.
Benefit | Description |
|---|---|
Uses less power and saves you money. | |
Extended Lifespan | LEDs work longer and need less fixing. |
Minimal Heat | Keeps your area cool and comfy. |
Precise Color Control | Shows true colors with easy changes. |
You can try new ways to set up your box. You can use different backgrounds and change the brightness. This helps you make creative photos. These boxes work for anyone, no matter your budget or skill. Just start testing and see what you can make!
FAQ
How do I clean my photo studio box?
You can wipe the inside with a soft, dry cloth. For tough spots, use a damp cloth. Make sure the box is unplugged before cleaning. Let it dry before you use it again.
Can I use my phone camera with a photo studio box?
Yes! Your phone camera works great with these boxes. Just place your phone on a tripod or steady surface. Adjust the lighting and background for the best shot.
What should I do if my LED lights look too bright?
Try lowering the brightness setting on your box. You can also move your subject farther from the lights. If your box has a diffuser, use it to soften the light.
Do I need extra lights with my studio box?
Most boxes have enough built-in LED lights. If you want more creative effects, you can add extra lights or reflectors. Start simple, then add more if you need them.
Can I change the background in my photo studio box?
Yes! Most boxes let you swap backgrounds. Try different colors or textures to see what looks best. You can use paper, fabric, or even printed designs for fun effects.
See Also
Captivating Acrylic Light Box Photography Techniques Revealed
Top 10 Acrylic Light Boxes for Beautiful Photo Displays
Exploring Acrylic Light Boxes: Varieties, Advantages, and Uses
