Light Box Art: Techniques, Applications, and Creative Possibilities

You might be surprised by how light box art changes your creative work. A light box uses glowing films and see-through materials. This makes your art look brighter and more colorful. You can turn your designs around easily. This helps you try out new styles and ideas. This tool makes creativity feel new and fun. Many artists enjoy the way it uses more than one sense. The glowing light mixes with your room. If you want to be more creative, a light box gives you many new ideas.
Key Takeaways
A light box helps you make art look brighter and more colorful. It lets artists try new styles and ideas with ease.
You need to set up your light box the right way. Put it on a steady table. Change the brightness as needed. Hold your paper in place for smooth work.
Tracing with a light box helps you be more exact. Use easy steps to copy designs onto different materials well.
Layering methods give your art more depth. Try things like glazing and collage for cool effects.
Light boxes can be used for many things like drawing, calligraphy, embroidery, and screen printing. They help you get great results in your projects.
Light Box Art Techniques
Light Box Setup
You want your creative process to start smoothly, so setting up your light box matters. Most artists use models like the Daylight Wafer LED Light Box, Gagne Porta-Trace LED Light Boxes, or the Artograph LightTracer Light Box. These options give you even, bright light and make your workspace feel professional. Some light boxes, like the Studio Designs Artograph LightPad Table, look stylish and work well for drafting.
When setting up and using your light box, place it on a flat, stable surface. Adjust the brightness to match your room’s light. If your eyes feel tired, take a break or wear blue light goggles. Always keep a safe distance from the light source. If you notice the light feels too strong, cover part of the screen or lower the brightness. Only turn on the light box when you need it. This keeps your eyes comfortable and helps you focus on your art.
Tip: Secure your paper with low-tack tape. This stops it from slipping and keeps your tracing lines sharp.
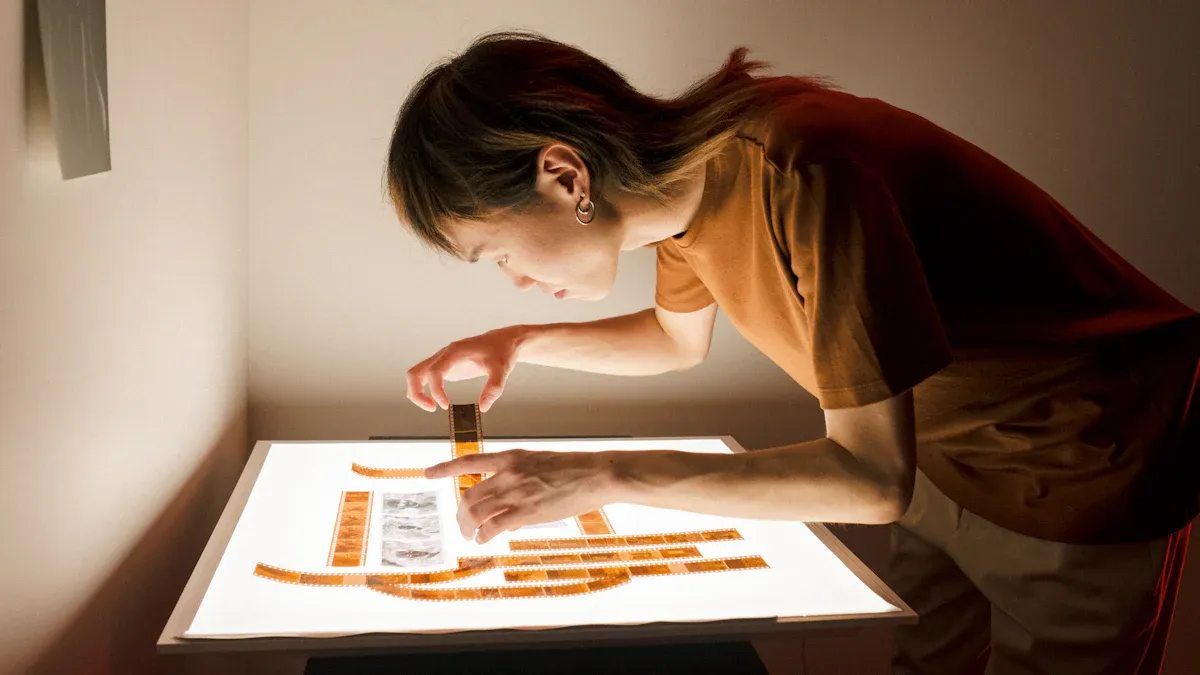
Tracing Basics
Tracing is one of the most popular uses for a light box. You can copy images onto paper, fabric, or other materials with ease. Many artists use tracing to transfer designs, practice calligraphy, or plan out embroidery. You might wonder if tracing is just for beginners, but even professionals use it to speed up their work and improve tracing accuracy.
Here’s a step-by-step guide to tracing with a light box:
Place your reference image on the light box.
Lay your drawing paper or fabric on top.
Secure both layers with tape.
Turn on the light box and adjust the brightness.
Trace the main lines and shapes, focusing on the composition.
Add details and shading after you finish the outline.
Tracing accuracy improves when you use a light box, especially for complex subjects. You can organize your composition and plan your design transfer before adding your own style. Remember, tracing helps you learn, but you still need skill to finish the artwork.
Note: If your paper is thick or textured, use a darker pencil or increase the brightness. For thin or fragile papers, handle them gently and use low-tack tape.
Layering Methods
Layering brings depth and color to your light box art. You can use several techniques to create interesting effects. Try these methods to make your artwork stand out:
Glazing: Brush on thin, see-through layers of paint. This makes your colors look brighter and richer.
Watercolor Lifting: Dab away wet paint to show the layer underneath. This adds highlights and texture.
Sgraffito: Scratch through wet paint to reveal the color below. This creates cool textures.
Collage: Glue different materials together. You can use paper, fabric, or even foam core board for extra depth.
Mixed Media: Combine paint, ink, and other materials for unique results.
Underpainting: Start with a single-color base layer. Add more colors on top to build your composition.
Impasto: Use thick paint to make your art feel three-dimensional.
For multi-layered projects, try materials like white card stock, copy paper, foam core board, or even glass panels. You can add RGB LED strip lights for glowing color effects. Pins, glue, and screws help hold everything in place.
Step-by-step guide: Plan your composition, choose your materials, and build up layers one at a time. Let each layer dry before adding the next.
Advanced Effects
You can push your light box art further with advanced techniques. Try using colorful LED lights to create smooth gradients and glowing effects. Experiment with LED long exposure for dynamic, moving designs. Mix traditional art with digital elements for a modern twist.
Some artists use creative LED light painting to add bold color and movement. You can blend different light sources or use mixed media for surprising results. If you want to try something new, combine paint, collage, and LED lights in one project.
Common mistakes: Uneven lighting can ruin your work. Choose a high-quality light box for even brightness. Paper slippage makes tracing hard, so always tape your materials. Thick or textured papers may block the light, so adjust your tools and press firmly.
A step-by-step guide helps you avoid problems:
Check your light box for even lighting.
Secure your papers before tracing.
Adjust brightness for your paper type.
Build up layers slowly and let each one dry.
Try new color effects with LEDs or mixed media.
You can use these techniques to improve your tracing accuracy, organize your composition, and make your light box art unique. Setting up and using your light box the right way opens up endless creative possibilities.
Light Box Art Applications
Illustration & Drawing
A light box helps you draw better. It lets you copy sketches with care. You can fix shapes and sizes easily. Your lines look neat and your characters stay the same. If you want to add layers or shapes, it is simple. You can line up patterns for repeating designs. Stencils are easy to place for crafts. Textile artists use light boxes to move patterns onto fabric. This works even on dark cloth.
Here’s how a light box helps with drawing:
You can trace sketches and outlines with accuracy.
You can stack parts for detailed designs.
Your art stays the same in a series or on character sheets.
You can match up patterns for smooth designs.
Stenciling and crafts are easier with good placement.
If you want your art to look pro, a light box gives you control and clear lines.
Calligraphy & Lettering
A light box makes calligraphy and lettering easier. The light helps you see your lines well. Your letters look smooth and even. You can trace old sketches or guides. This keeps your letters spaced right. It is great for fancy paper because you make fewer mistakes.
You can use a light box for:
Practicing calligraphy and brush lettering
Tracing your own letter shapes to learn better
Making guides for your projects
Sketching layouts for watercolor words without pencil marks
Writing on envelopes with perfect lines
A light box helps you add shadows in the right spot. Your letters look neat and pro every time.
Embroidery & Quilting
A light box makes embroidery and quilting simple. You use light to move your design to fabric. Tape your pattern and fabric to the light box. You can also trace over a digital screen. These ways work best with light or see-through fabric. Your design stays clear and correct.
Many people like the Lori Holt Easy Trace Light Box, Cutterpillar Glow Ultra Light Tablet, Wafer 2 Lightbox, and Cutterpillar Glow Elite Mini. These are bright, slim, and easy to carry. A modern light box helps with Foundation Paper Piecing. You get sharp lines and your pieces fit right.
Since I got the Daylight Company Wafer One Lightbox, my Foundation Paper Piecing is much better. The Lightbox is slim, modern, small, and very bright.
Scrapbooking & Tattoo Design
A light box is good for scrapbooking and tattoo design. The flat, bright surface lets you see your work well. You can trace small details and make your patterns look great. Artists like light boxes with bulbs that last a long time. This makes tracing and looking at designs easy.
If you want to make custom scrapbook pages or tattoos, a light box helps you copy your ideas well. You can work on hard layouts and make sure every part looks good.
Dry Embossing & Crafts
A light box helps with dry embossing and crafts. The light shines through paper so you can see stencil lines. You can tape your stencils to the light box for good placement.
Role of Light Boxes in Dry Embossing | Description |
|---|---|
Tracing Designs | Light boxes shine through images, making stencil lines easy to trace. |
Securing Stencils | You can tape stencils to the light box for perfect placement. |
You can use these ways for cards, paper crafts, and more. A light box keeps your work tidy and pro.
Screen Printing Light Box
A screen printing light box helps you move your design to the screen. A UV light box uses special light to set up the screen. This step makes the screen ready for your design. The best light is between 350 and 400 nm. This works well for screen printing.
You can use a screen printing light box for:
Using UV light to make sharp designs.
Setting the emulsion for good image transfer.
Making sure your art looks clear on the final item.
Helping your screen printing work every time.
Making pro prints for shirts, posters, and more.
Working faster with good exposure.
Making fewer mistakes when moving designs.
Getting the same results on many prints.
Using different materials like fabric or paper.
Trying new screen printing ideas.
Saving time when setting up.
Making your light box an important studio tool.
You can see that light box art helps in many ways. If you do drawing, calligraphy, embroidery, scrapbooking, crafts, or screen printing, a light box helps you do your best work.
Creative Projects & Innovative Visual Ideas
DIY Light Art
You can make fun projects with diy light art and a light box. Build a small light box using a frosted plastic box and LED lights. This lets you trace pictures or show off your art. You can also use it to soften light for photos. Your art will have softer light and nicer shadows. These projects help you see how light changes your drawings and patterns.
Tip: Use your light box to trace special patterns or display your finished art. You can switch between tracing and showing your artwork.
Custom Light Box Displays
You can create custom light box displays with easy-to-find materials. Use acrylic sheets, plywood, LED lights, and glue. Spray paint adds color. Cut shapes with an X-acto knife. Put it all together with screws and cable ties. These projects let you make displays for your room or studio. Show off digital art or handmade work. Try mixing wood and metal for a cool look.
LED light strips for bright lights
Plywood or metal for the back
Glue and tape for easy building
Power supply for your lights
You can make displays that show your ideas and help your art stand out.
LED Light Box for Contemporary Art
LED light boxes change how you look at modern art. Artists use these projects to mix tech and art. You can make glowing art that changes and moves. The light box art feels like you are inside it. You control the mood and story with light. People feel like they are part of the art.
How LED Light Boxes Help Contemporary Art |
|---|
Mix tech with art ideas |
Turn art into cool experiences |
Use light to set mood and story |
Make bright and colorful scenes |
Let people join in the art |
Tell stories with light patterns |
Grow your art style |
Try adding buttons or controls to your projects. You can change colors or patterns with digital tools.
Animation & Flipbooks
Animation is easier with a light box. Stack your pages and trace each picture. You can make flipbooks that show things moving. Watch your drawing change from page to page. Scan your drawings and use digital tools to animate them. This helps you learn how to time and move your art.
Note: Flipbooks and animation work best with thin paper and clear lines. You can use both digital and hand drawing for better results.
Combining Digital & Traditional Art
You can mix digital and hand art in your projects. Start with a digital sketch, print it, and trace it on your light box. Add paint, ink, or collage by hand. Scan your finished art and edit it on a computer. You can make special patterns or mix drawing styles. This way gives you more choices and lets you try new things.
Use your light box to move digital art onto canvas or fabric. You can make projects that mix hand-drawn and digital art. Your creative ideas will really stand out.
Troubleshooting & Tips
Avoiding Glare & Overexposure
Glare can ruin your tracing experience. You want your art to look clear, not washed out. Here are some expert tips to help you avoid glare and overexposure:
Place a small white reflector inside your light box. This bounces light back and softens shadows.
If you work with shiny objects, use bigger light sources for softer reflections. Try black cards to add dark reflections and show the shape of your art.
Adjust your exposure settings. Spot metering helps you measure light in certain areas. Change your ISO, shutter speed, or aperture to control glare.
Move your camera or your head a little. Sometimes, a small shift can make reflections disappear.
Underexpose the brightest spots. This keeps details safe for editing later.
Tip: Always check your setup before you start tracing. A quick test saves you time and trouble.
Paper & Material Choices
Picking the right paper or fabric makes tracing easier. You want your lines to show up, but not bleed through. Here’s a table with expert tips for choosing materials:
Material Type | Description |
|---|---|
Thin white cotton | Works as a light diffuser. Makes your tracing look soft, like a cloudy day. |
Tissue paper | Also diffuses light. You can change colors by switching the tissue. |
Pellon | Stiff and white. Creates a bright enclosure for your light box. |
Tip: Try different materials for tracing. You might find a new favorite.
Preventing Smudges
Smudges can mess up your tracing. You want your lines to stay sharp. Here are some tips:
Wash your hands before you start.
Use a clean sheet of paper under your drawing hand.
Let each layer dry before you add more tracing.
Use pencils with harder leads for less smudging.
Tape your paper down so it doesn’t move.
Tip: If you see a smudge, erase it right away. Don’t wait until you finish tracing.
Consistent Results
You want your tracing to look the same every time. Consistency makes your art look professional. Here are some tips for steady results:
Use the same brightness setting on your light box for each project.
Keep your tracing paper flat and secure.
Mark your starting points so you line up your tracing every time.
Take breaks to rest your eyes. This helps you spot mistakes.
Review your tracing before you move to the next step.
Tip: Write down your favorite tracing settings. You can use them again for future projects.
You can unlock new creative worlds with light box art. Artists like Aline Maire use layering to build magical scenes that glow with depth. You get freedom to experiment with colors and techniques. A light box helps you refine your drawings and try new ideas. Start with simple tracing or jump into layered projects. Keep exploring, keep learning, and let your imagination shine.
FAQ
What is a light box and how do you use it?
A light box is a flat, bright surface that helps you trace, draw, or transfer designs. You just place your image and paper on top, turn on the light, and start tracing. It makes your creative work easier.
Can you use a light box for photography?
Yes! You can use light box photography to take pictures of small objects with soft, even lighting. Place your item inside the box, adjust the lights, and snap your photo. Your images will look clear and professional.
What materials work best with a light box?
You get the best results with thin paper, tracing paper, or light fabrics. These materials let the light shine through, making your lines easy to see. Try different options to find what works for your project.
Is a light box safe for kids?
Most light boxes are safe for kids if you follow the instructions. Always supervise younger children. Make sure they use low heat settings and avoid staring at the light for too long.
How do you keep your tracing clean and neat?
Wash your hands before you start. Use a clean sheet under your drawing hand. Tape your paper down so it doesn’t move. Take breaks to check your work and erase any smudges right away.
See Also
Exploring Acrylic Light Boxes: Varieties, Advantages, and Uses
Understanding Acrylic Light Boxes: Uses, Perks, and Choosing Tips
Key Features of Acrylic Light Boxes for Stunning Photography
Capturing Images with Acrylic Light Boxes: A Guide
Acrylic LED Light Boxes: Varieties, Uses, and Setup Instructions
