LED Light Pads for Wall Installation

You can put LED Light Pads on walls with sticky backing. You can also attach them to slat wall panels. You can pick RGB colors and use an app to change them. This makes it easy to set up the lights how you like. Many people want to know how to pick the best product. They also ask how to install the lights without problems. People also want to make sure their wall works well with these lights.
Key Takeaways
LED Light Pads have many features. They include RGB color options and smart controls. You can change your lighting easily. You can make it look how you want.
It is important to install them the right way. Clean your wall first. Prepare the surface so the adhesive sticks well. This helps the lights last longer.
Take care of your LED Light Pads often. Clean them and check the connections. This keeps them working well and looking bright.
LED Light Pads Overview
Types of LED Light Pads
You can find many types of LED Light Pads for your wall. Some pads offer simple white light. Others let you pick colors with RGB features. You might like pads that connect to an app. These smart pads let you change brightness, colors, and effects right from your phone. Some even sync with music, so your lights dance along with your favorite songs.
Here’s a quick look at smart features you can get:
Feature | Description |
|---|---|
Smart APP and Remote Control | Control colors, brightness, and effects. Pick from over 16 million color options. |
Music Synchronization | Sync lights with music. Create a fun and interactive atmosphere. |
You can choose pads for homes, offices, or even restaurants. Each type brings its own style and mood to your space.
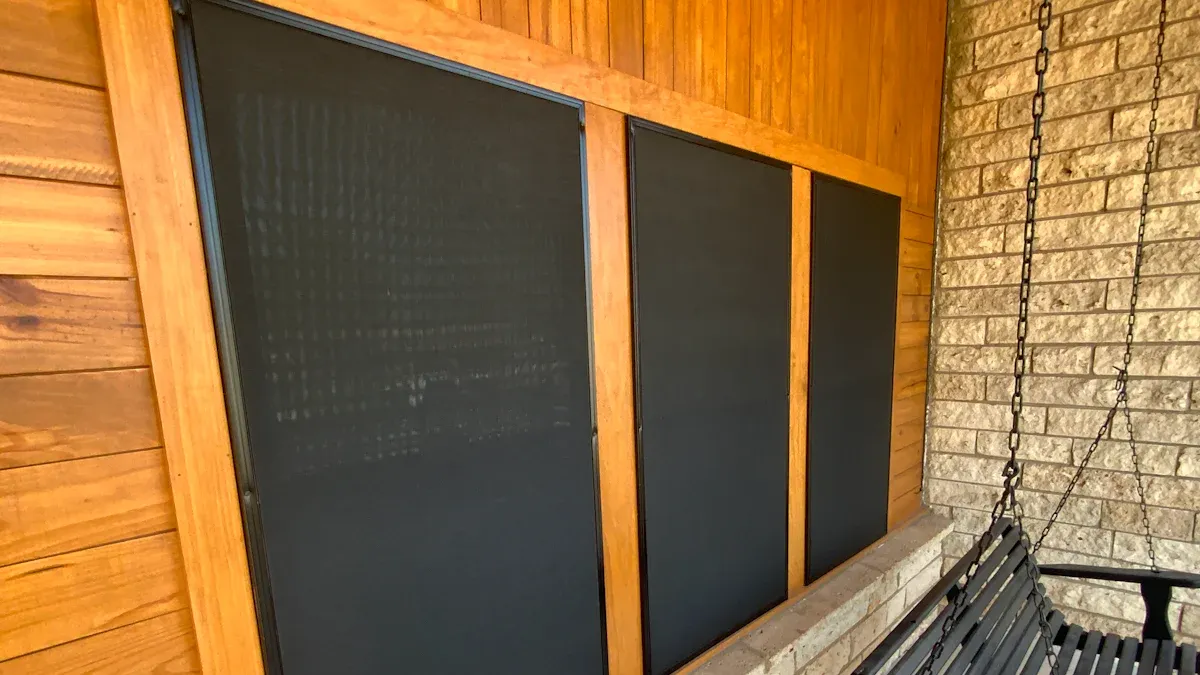
Wall Installation Options
You have several ways to install LED Light Pads. Some pads stick right to the wall with adhesive backing. Others fit into slat wall panels or wood slat panels. You can use these pads in many places, like schools, hotels, or retail stores.
Here are some reasons people love wall-mounted LED Light Pads:
Save up to 70% on energy bills.
Use pads for 50,000 to 100,000 hours before replacing.
Enjoy bright, even light that makes rooms look better.
Trust the strong die-cast aluminum build. These pads last and handle tough conditions.
Check out where you might see these pads:
Application Type | Examples |
|---|---|
Parking & Area | Yes |
Schools | Yes |
Office Lighting | Yes |
Commercial Lighting | Yes |
Building Perimeter | Yes |
Landscape | Yes |
Warehouse | Yes |
Retail Lighting | Yes |
Restaurant Lighting | Yes |
Healthcare | Yes |
Hospitality Lighting | Yes |
Church Lighting | Yes |
Residential Lighting | Yes |
Tip: Always check your wall surface before installing. Smooth, clean walls help pads stick better and last longer.
Benefits
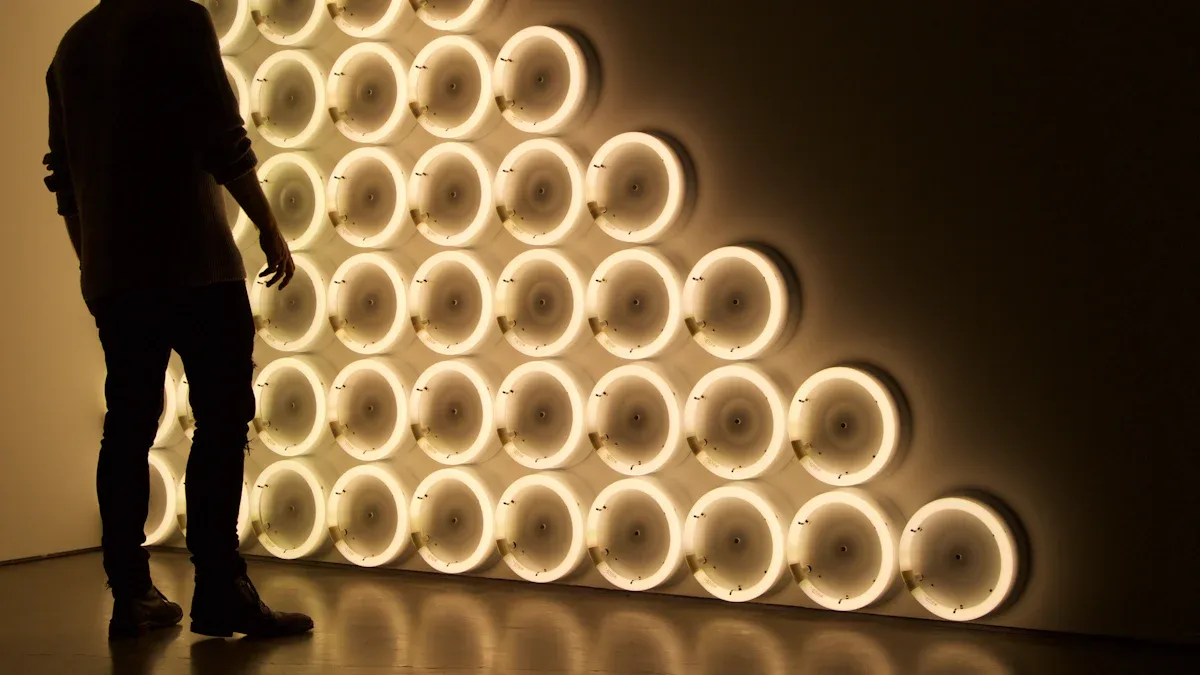
Visual Appeal
You want your space to look amazing, right? LED Light Pads help you do just that. These lights can turn a plain wall into a cool feature. You can pick colors, change brightness, and even set the mood for any event. In stores, lighting makes a big difference. Good lighting attracts customers and can even boost sales. That’s why many shops use creative lighting designs to stand out.
You’ll also see these lights in hotels, restaurants, and homes. They make rooms feel modern and welcoming. Even outside, LED lighting can highlight gardens or building features. People notice when a space looks bright and inviting.
Tip: Try using different colors for different moods. Warm colors feel cozy, while cool colors look fresh and clean.
Energy Savings
Saving energy is a big deal. LED Light Pads use much less power than old-style bulbs. You save money on your electric bill and help the planet at the same time. Check out how LEDs compare to other bulbs:
Bulb Type | Annual Operating Cost | Lifetime Energy Cost | Lifetime Replacement Cost | Total Lifetime Savings |
|---|---|---|---|---|
LED | N/A | $0 | $76.12 (vs Halogen) | |
Halogen | $12.56 | $68.02 | $10.22 | N/A |
Incandescent | $17.53 | $102.07 | $8.89 | N/A |
CFL | $3.80 | $8.01 | $1.74 | $7.63 (vs LED) |
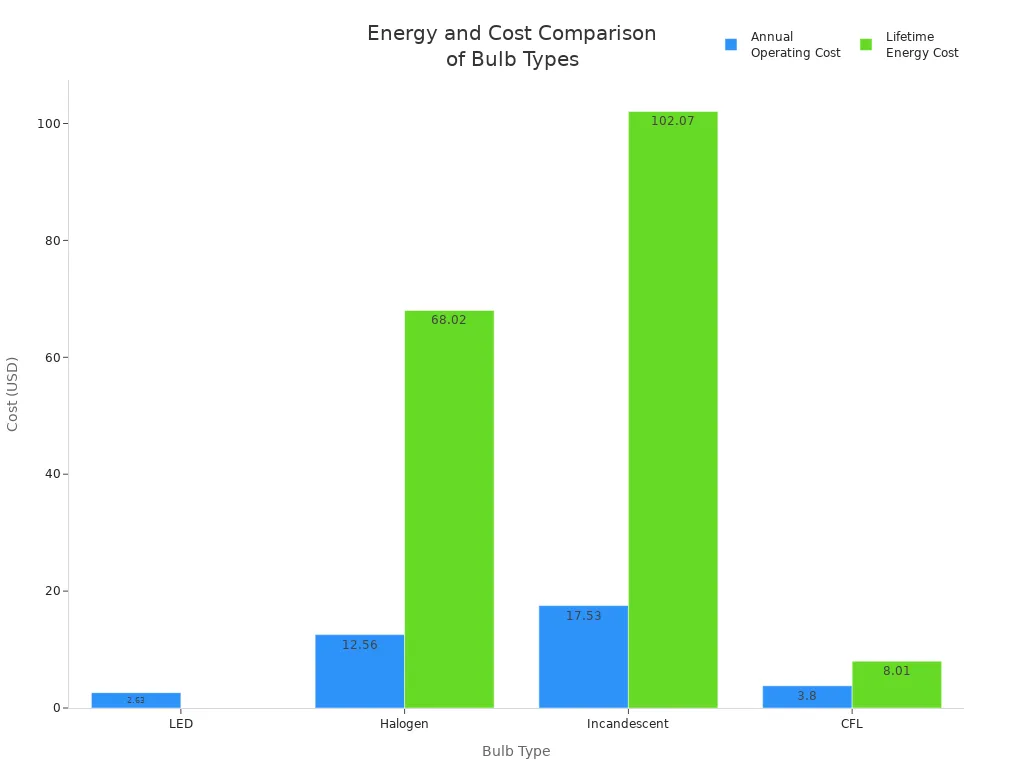
You can see that LEDs cost less to run and last much longer. That means more money in your pocket and less hassle changing bulbs.
Installation Guide
Planning
You want your LED Light Pads to look great and work safely. Start by planning your setup. Sketch out where you want each pad. Decide how many pads you need and where the power source will go. Measure your wall and mark the spots for each pad. Think about how the light will spread across the room. If you use slat wall panels or wood slat panels, plan the layout so the pads fit neatly between the slats.
Here’s a simple step-by-step plan:
Choose the type of LED Light Pads you want.
Mark the installation points on your wall.
Calculate the length of LED strips or the number of pads needed.
Plan where the power supply and controller will sit.
Sketch your layout before you start.
Tip: Always check your wall for obstacles like outlets or switches before marking your layout.
Tools Needed
You don’t need fancy tools to install LED Light Pads, but having the right ones makes the job easier. Here’s what you should gather:
LED Light Pads or strips (make sure you have the right length and type)
Quick connectors for easy wiring
Scissors for cutting strips at marked points
Double-sided tape or mounting clips for extra security
Cleaning supplies (like isopropyl alcohol)
Screwdriver (if you use screws or brackets)
Wire strippers and cutters for wiring
Note: If you plan a big installation, you might want extension cables or splitters.
Surface Prep
Getting your wall ready is super important. Clean walls help your LED Light Pads stick better and last longer. Start by wiping the wall with a dry cloth. Use isopropyl alcohol or a degreaser to remove any grease or dust. If your wall feels slick, lightly sand it to give the adhesive something to grip. For tricky surfaces, you can use primers or adhesion promoters.
Here are some ways to prep your wall:
Lightly sand or scuff the area for better grip.
Use masking tape or transparent PVC tape on painted drywall. This protects your paint and makes removal easier.
Avoid sticking pads directly to wallpaper, matte paint, or bare wood. These surfaces can get damaged.
Tip: Always let the wall dry completely before you start mounting anything.
Mounting
Now you’re ready to put up your LED Light Pads. If you use adhesive backing, peel off the cover and press the pad firmly onto the wall. For smooth surfaces, double-sided tape works well. On textured walls or wood slat panels, use screws or mounting clips for extra hold.
Follow these steps for a neat installation:
Test your LED Light Pads before mounting.
Cut strips at marked points if needed.
Assemble pads or strips into profiles.
Use adhesive tape for smooth walls. For rough surfaces, use screws or brackets.
Press each pad firmly for a few seconds to make sure it sticks.
Use masking tape or PVC tape under the adhesive if you want to protect your wall.
Callout: If you notice pads drooping, add mounting clips for extra support.
Wiring
Wiring makes your LED Light Pads shine. Always match your power supply to the voltage and wattage of your pads. Use connectors to join strips or pads together. Strip and cut wires cleanly for safe connections. If you use app-controlled pads like TISOFU Hexagon Lights, make sure the controller matches your setup.
Here’s what you should do:
Check that your power supply and controller are compatible.
Use quick connectors for easy wiring.
Avoid running your power supply at full capacity.
Use extension cables for longer runs, but watch for voltage drop.
Keep wires neat and out of sight. Use channels or diffusers to hide them.
Make sure there’s good airflow around your pads to prevent overheating.
Tip: For big or permanent setups, ask a professional for help with wiring.
Choosing LED Light Pads
Features
When you pick LED Light Pads for your wall, you want to look for features that make your space shine and last. Some pads let you change colors with RGB, while others work best for commercial spaces or custom designs. You might want smart controls, longer lifespan, or a clean look. Here’s a table to help you compare what matters most:
Feature | Description |
|---|---|
Longer Lifespan | Stays bright and colorful for years, thanks to good thermal management. |
Greater Consistency | Keeps the light even across your wall, so everything matches. |
Enhanced Safety | Uses certified parts to lower electrical risks. |
Reliability | Won’t quit early, so you save money and avoid hassle. |
Aesthetic Considerations | Mounting and placement change how your wall looks. |
Control Options | Lets you dim, change colors, and set effects for any mood. |
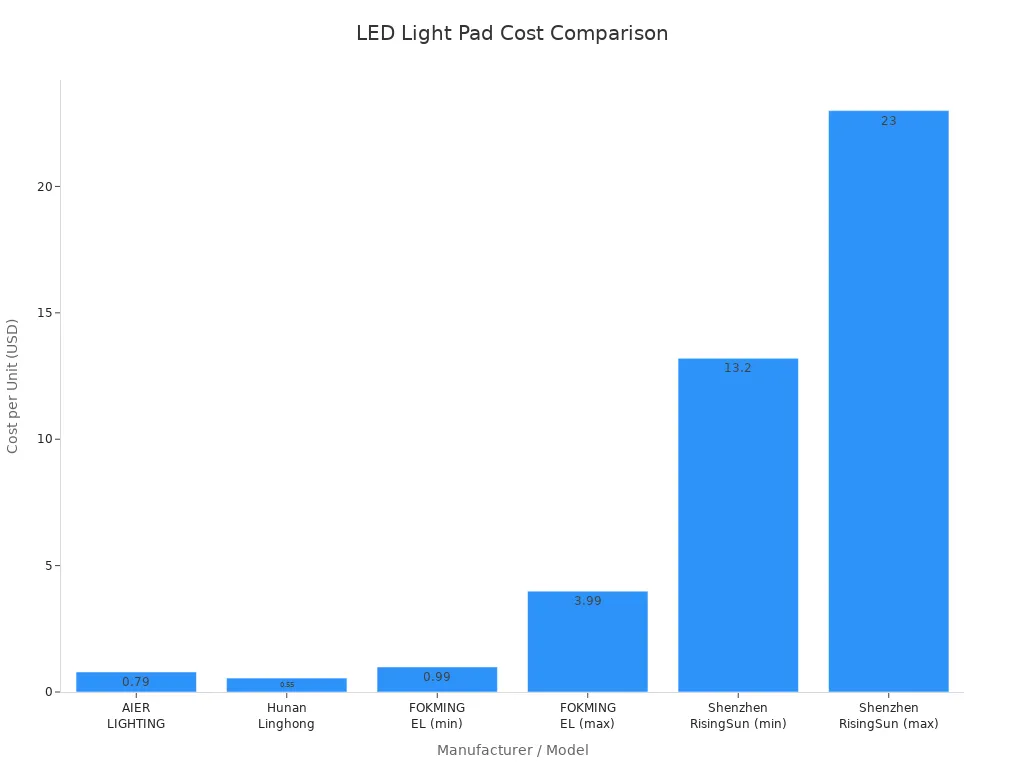
You can choose surface mounting for easy setup, but recessed installations look cleaner. Diffusers help soften the light and cut down glare. If you want smart features, check out TISOFU Hexagon Lights or Slatpanel Glow. Custom panels give you more options for size and shape. Take a look at how costs and features compare:
Manufacturer | MOQ | Cost per Unit | Features/Applications |
|---|---|---|---|
AIER LIGHTING TECHNOLOGY | 500 pcs | $0.79 | Basic, high-volume commercial applications |
Hunan Linghong | 10 pcs | $0.55 | Budget-friendly options |
Ningbo Eurolite | N/A | N/A | Smart integration (Alexa/Tuya RGBW/CCT) |
Shenzhen Benory | N/A | N/A | Smart integration (DALI/KNX/Tuya/WiFi CCT) |
FOKMING EL | N/A | $0.99-$3.99 | Decorative backlighting |
Shenzhen RisingSun | N/A | $13.20-$23 | Flexible, cuttable sheets for DIY projects |
YOUCOM | N/A | N/A | Suspended hexagon panel for retail/hospitality |
Starlake Ltd | N/A | N/A | High build quality, 5-year warranty |
Alite Co. | N/A | N/A | UL-listed for regulated environments |
Tip: If you want a unique look, custom panels let you match your style and budget.
Power Supplies
Getting the right power supply keeps your lights safe and bright. You need to match the voltage and wattage to your setup. The UL ETL LED Strip Light Power Supply works with 12V, 24V, 36V, and 48V, so you can use it for many types of pads. For big projects, PowerBar V3 LED modules give you strong light and easy connections.
Here’s how you can pick the right power supply:
Use the 80% rule. Choose a supply that runs at no more than 80% of its max power.
Figure out how much power you need. Divide your total LED wattage by 0.8.
Measure your strips or pads and check their power draw.
Pick a supply with at least 20% more wattage than you need.
Note: Always check the length and voltage of your pads before buying a power supply. This helps you avoid flickering or overheating.
Maintenance
Cleaning
You want your LED Light Pads to shine bright and last as long as possible. Regular cleaning helps you keep them working well. Grab a soft, damp cloth and gently wipe the surface of each pad. Dust and dirt can block the light and make your wall look dull. Try to clean your pads every month. If you see smudges or fingerprints, clean them right away.
You should also check the diffusers and lenses. Dirt can build up and lower the brightness. Make sure these parts stay clear. During your cleaning, look for any loose wires or signs of wear. If you spot damage, fix it before it gets worse.
Here’s a quick table to help you remember when to do each task:
Maintenance Task | Frequency |
|---|---|
Visual Inspections | Weekly |
Cleaning and Dusting | Monthly |
Ballast and Driver Inspection | Quarterly |
Documentation and Records | Yearly |
Tip: A clean LED pad not only looks better but also works better. You can expect high-quality pads to last 4 to 6 years, and sometimes up to 17 years if you use them for 8 hours a day.
Troubleshooting
Sometimes your LED Light Pads might not turn on or show the right colors. Don’t worry! You can fix most problems yourself. First, check the power source. Plug another device into the outlet to see if it works. If the outlet is fine, look at all the connections. Make sure everything is tight and lined up.
Use a multimeter to test the voltage. Your pads usually need 12V or 24V. If the voltage is wrong, your lights won’t work. Look for loose wires or signs of damage. If you see a burned spot or broken part, replace it. Sometimes, a segment fails because of a defect or physical damage.
Note: If you follow these steps and your lights still don’t work, you might need to check for short circuits or ask a professional for help. Keeping your pads clean and checking them often helps you avoid most problems.
You can make your room look cool and save energy with LED Light Pads. Here are some good things about them:
Benefit | Description |
|---|---|
Shock Resistant | Can handle bumps and shakes without breaking. |
Multi Color | Lets you choose fun and different colors. |
Uses less electricity and saves you money. |
Here are some tips for installing them safely:
Use a 24V DC power supply that is stronger than your pad needs.
Do not touch wires when the power is on.
Pick waterproof pads if your room is wet or damp.
Try LED Light Pads and watch your room get brighter!
FAQ
How do you remove LED Light Pads without damaging your wall?
Gently peel the pad off. Use a hair dryer to warm the adhesive. Clean any sticky residue with rubbing alcohol.
Can you cut LED Light Pads to fit your wall?
No, you cannot cut most LED Light Pads. Only LED strips allow cutting. Always check the product instructions before you try.
What should you do if your LED Light Pads won’t turn on?
First, check the power supply. Make sure all wires connect tightly. Try a different outlet. If nothing works, contact the manufacturer for help.
See Also
Understanding Wall Mounts for LED Light Box Displays
Exploring Types and Uses of Acrylic LED Light Boxes
Selecting the Ideal Display System for Your LED Light Box
Different Types and Uses of Acrylic Light Panels
Installing Wall-Mounted Sign Holders for Professional Displays
