How to Install Frame with Light Box


You can install frame with a light box at home, even if you have never done it before. The process feels simple: just assemble, add lighting, connect power, and secure everything. Safety matters, though. Electrical installation can lead to fire hazards or shocks. You will love the new ambiance in your space!
Key Takeaways
Collect all your tools and materials before you start. This helps you work faster and make fewer mistakes. - Always follow safety rules, especially with electrical parts. If you are not sure, ask a professional for help. - Measure your space and plan where to put the light box. This makes sure it fits right and looks good.
Tools and Materials
Checklist
Get all your tools and materials before you begin. This helps you work faster and make fewer mistakes. Use this table to help you stay organized:
Category | Items and Details |
|---|---|
Materials | Acrylic sheets (for the sign face), plywood or metal backing (aluminum is great for durability), LED lights (bright and even), adhesives, double-sided tape, power supply (for LEDs) |
Tools | Scissors, hacksaw (for cutting), drill (for holes and wiring), clamps (to hold parts), tape measure |
Assembly Tips | Measure twice before cutting, smooth edges with sandpaper, attach LED strips evenly, secure acrylic sheet, apply graphics carefully, use strong tape for the frame and back panel |
Installation | Use sturdy brackets, weatherproof for outdoor use, check electrical connections, protect wiring, test LED lights before finishing |
Tip: Always look for UL or CE marks on electrical parts. This keeps your lightbox safe and working well.
Frame and Lightbox Types
There are many frame and lightbox types you can pick. Frameless fabric lightboxes look new and stylish. They work in homes and businesses. You can get them in thin, single-sided, or double-sided styles. LED snap frames are easy to use. They come in slim or regular sizes. You can change graphics quickly with them.
A wooden frame gives a classic and warm look. People use these for movie posters or art. SEG lightbox models use silicone edge graphics for a smooth finish. You can also find SwingFrames, snap frames, and slide-in frames. These come in metal or wood. They fit many kinds of graphics, like posters or signs. You can use them in offices, stores, or at home.
Prepare Area
Location
Before you start preparing the installation area, take a good look at your space. You want your light box frame to stand out and look great. Here are some things to check:
Measure the wall or surface where you plan to hang the frame. Make sure the size fits well and does not crowd the room.
Think about what you want to show with your light box. Pick a spot that matches the message or mood you want.
Place the light box where people can see it easily. Avoid spots with glare from windows or lights.
Check the viewing angle. Try different heights and positions to see what looks best.
Make sure nothing blocks the view, like furniture or doors.
Choose a location that matches your style. Sometimes you want the frame to blend in, other times you want it to pop.
Test the spot before you start. Hold up the frame or use painter’s tape to mark the area.
Tip: For outdoor installation, pick a spot that stays dry and safe from wind or rain. Use weatherproof materials if needed.
Safety
Safety comes first when preparing the installation area, especially with electrical work. Follow these steps to keep yourself safe:
Turn off the power at the breaker box before you touch any wires.
Use a voltage tester to make sure the wires are not live.
Gather all your tools and materials before you start.
Plan where the electrical box will go. Make sure it can hold the weight of your light box.
Use high-quality wires, connectors, and the right electrical box.
Double-check that all wire connections are tight and covered.
After you finish, turn the power back on and test the light box.
If you ever feel unsure about wiring, call a licensed electrician. It is always better to be safe than sorry.
Step-by-Step Guide
Ready to install frame with a lightbox? This step-by-step guide will help you get a professional result, even if you’re new to DIY projects. Let’s break it down into simple steps.
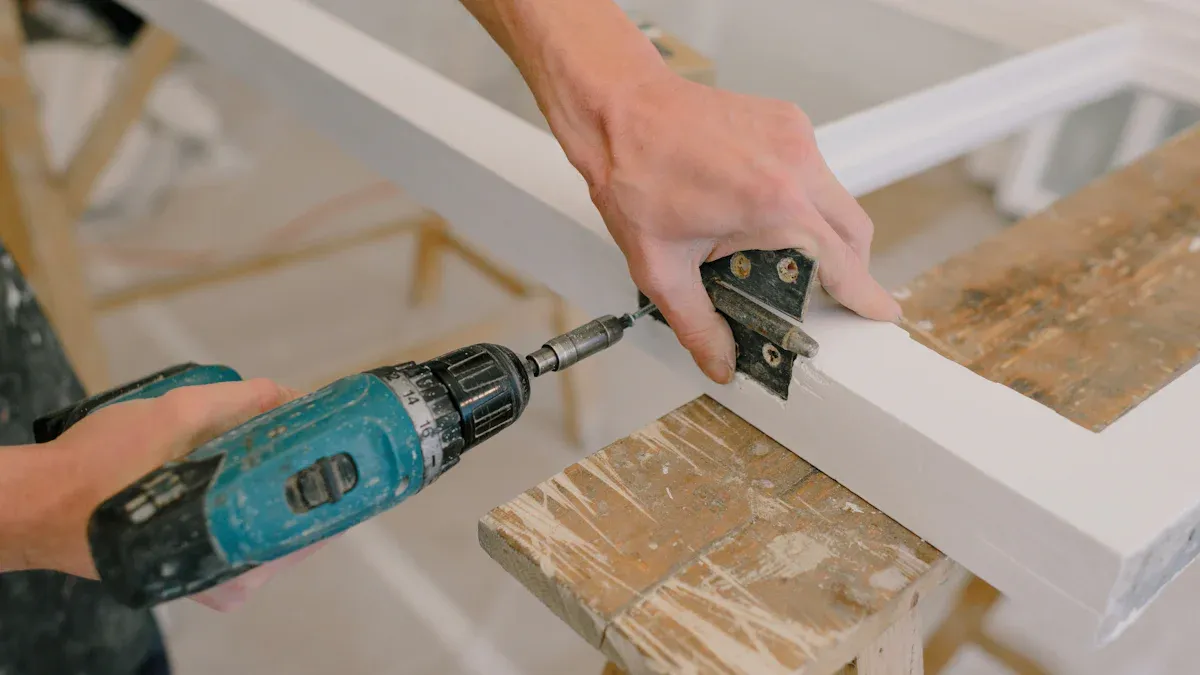
Assemble Frame
Start by laying out all the parts for your frame. You might have an aluminum, SEG lightbox, snap, or wooden frame. Each type has its own assembly method, but the basics stay the same.
For aluminum and SEG lightbox frames:
Lay out the frame pieces on the floor. Use chalk lines to make sure everything is square and matches your plans.
Connect the corners. Most aluminum frames snap or screw together. Double-check that each corner is tight.
If you have a SEG lightbox, insert the silicone edge graphics into the grooves. Make sure the fabric is smooth and wrinkle-free.
Mark the locations for any window or door openings if your frame is large. Measure carefully and mark stud locations.
For snap frames:
Open the snap edges and insert your graphics. Close the edges to lock the graphics in place. Make sure the face sits flat.
For wooden frames:
Measure and cut your wood pieces. Sand the edges so they’re smooth.
Nail or screw the corners together. Use clamps to hold the frame steady.
Build full-height headers if needed. Nail them securely before you finish the wall assembly.
Tip: Avoid common mistakes like misaligned walls or improper stud placement. Always mark your layout on the floor first and transfer marks from the top plate to the bottom plate. Don’t overdrive nails, as this can weaken the frame.
Install Lighting
Now it’s time to add the lighting. Most lightboxes use LED strips or panels. Here’s how you do it:
Lay the LED strips or panels inside the frame. Keep them evenly spaced for a bright, even glow.
Secure the lights with the clips or adhesive provided. Don’t block any ventilation holes—LEDs need airflow to stay cool.
Leave space for wires to reach the power supply.
If your lightbox has a diffuser, place it over the LEDs. This helps spread the light evenly across your graphics.
Safety Note: Handle all electrical parts with care. Use the right tools and double-check every connection. Make sure you can access the LEDs later for inspection or replacement.
Connect Power
You’re almost done! Connecting the power brings your lightbox to life.
Turn off the power at the breaker before you start.
Connect the LED wires to the power supply. Follow the color codes and instructions that came with your kit.
Secure all connections with wire nuts or connectors. Tug gently to make sure nothing comes loose.
Plug in the power supply or hardwire it to your wall outlet, depending on your setup.
Turn the power back on and test the lights. If they don’t work, check your connections.
Tip: If you feel unsure about wiring, call a licensed electrician. Safety always comes first.
Secure Frame
The last step is mounting the lightbox securely. You want it to stay put and look great.
Find the wall studs or ceiling joists. Use a stud finder for drywall.
For mounting the lightbox, screw or nail the frame directly into the studs. This gives the best support.
If you can, add solid wood blocking between joists for extra strength.
Use mounting brackets that match your frame and wall type. Some brackets let you adjust the position for a perfect fit.
Ground all metal boxes and brackets with grounding screws. This keeps your installation safe.
For heavy lightboxes (over 50 pounds), use a fan box or special hardware.
Double-check that your hardware matches the screw hole spacing on your outlet box.
Note: Most manufacturers do not provide official downloadable instructions. You can find helpful DIY guides and community tutorials online, but always check that your installation meets local electrical codes.
Quick Checklist for Mounting the Lightbox:
Use UL-listed parts
Match hardware to your wall type
Ground all metal parts
Test the lights before finishing
When you follow these steps, you install frame with a lightbox that looks sharp and works safely. Take your time, measure twice, and enjoy your new display!
Installing LED Lightboxes

LED Strips
When you start installing led lightboxes, you will notice that LED strips make the job much easier. These strips give you bright, even light across your backlit display. You can cut them to fit almost any frame size. Most LED strips last up to 100,000 hours. That means you can enjoy your lightbox for years without worrying about changing bulbs. If you run your lightbox for 10 hours each day, it can last over 13 years before you see any dimming. LEDs also use less energy than old lighting types, so you save money on your power bill.
Here’s a quick look at why LEDs work better than traditional lights:
Advantage Category | LED Lightboxes Benefits | Traditional Lighting Comparison |
|---|---|---|
Energy Efficiency | Lower energy use, longer life | Higher energy use, shorter life |
Visual Appeal & Brightness | Uniform, vibrant backlit displays | Less even, duller backlit displays |
Maintenance | Low upkeep, instant-on | More upkeep, flickers over time |
Tip: Turn off your lightbox when you don’t need it. This helps your LED strips last even longer.
Dimmable Options
You can make your backlit display stand out by using dimmable LED options. These let you control how bright your lightbox gets. Sometimes you want your sign to shine bright. Other times, you want a softer glow. Dimmable LEDs let you adjust the light down to 10% of full power. You can even change the color or add effects like strobe lights. This makes your backlit displays more eye-catching and flexible for any space or mood.
If you want a modern look and easy control, installing led lightboxes with dimmable features is a smart choice. You get a display that looks great, saves energy, and lasts for years.
Lightbox with Wooden Frame
DIY Assembly
Building a lightbox with wooden frame feels rewarding and fun. You get to shape each piece and see your project come together. Here’s a simple way to assemble your wooden lightbox:
Cut your wooden boards with 45-degree angles at the ends. Use a saw fence to keep your cuts straight.
Glue three sides together at the corners. Place your acrylic sheet inside to help line up the edges. You can use 90-degree triangles to hold the frame steady.
Add a small wooden wall inside the box. This makes your frame stronger and gives you a spot for bolts.
Fix any small gaps by gluing and sanding thin wood pieces. This helps your frame fit perfectly.
Drill holes for bolts and chamfer them so the bolt heads sit flat.
Sand the outside edges by rubbing the frame on sandpaper glued to a flat board. This keeps the surface even.
Make small spaces for nuts using a drill or dremel. Glue them in place with epoxy.
Attach the bottom plate and trim the edges. Drill holes for the switch and charging port.
Stain the wood with two coats to show off the grain. Let it dry between coats.
Paint the inside bottom white. This helps the light bounce and look bright.
Install the power parts and wiring. Use double-sided tape to keep things neat.
Stick on the LED strips, solder the wires, and test each strip as you go.
Slide in the acrylic sheet, close the last side, and tighten the bolts.
Tip: Thin corner stiffeners help keep your lightbox with wooden frame strong without blocking the light.
Diffuser and Finishing
You want your lightbox with wooden frame to shine with smooth, even light. The right diffuser makes a big difference. Here’s a quick guide to popular diffuser choices:
Diffuser Type | Pros | Cons |
|---|---|---|
Frosted Acrylic | Looks great, strong | Can cost more |
Milk Glass | Soft, even light, durable | Heavy, breaks easily |
Translucent Plastic | Flexible, tough | Can be tricky to install |
Fabric Diffuser | Cheap, easy to use | Not as strong, absorbs light |
Most people pick frosted acrylic for a wooden lightbox. It spreads the light and keeps your display looking sharp. After you add the diffuser, check the edges and sand them smooth. Wipe away dust and add a second coat of stain if you want a deeper color. Now your lightbox with wooden frame is ready to hang and enjoy!
Test and Adjust
Power On
You finished building your lightbox. Now it’s time for the fun part—turning it on! Plug in your lightbox or flip the switch. Watch for any flickering or dark spots. If you see problems, check your wiring and make sure all LED strips sit in place. Sometimes, a loose connector or a missed wire causes issues.
Tip: Always stand back and look at your lightbox from different angles. This helps you spot uneven lighting or shadows you might miss up close.
If your lightbox lights up evenly, you’re off to a great start! If not, turn off the power and adjust the LED strips or panels. Make sure nothing blocks the light. Once you fix any issues, power it on again and check.
Adjust Lighting
You can make your lightbox look just right by adjusting the lighting. Many modern lightboxes use LEDs that let you change both brightness and color temperature. Here’s how you can get the best results:
Warm light (around 2700K) gives a cozy, soft feel. Cooler light (up to 5000K) works well for workspaces or places where you want things to look crisp.
Some LEDs let you dim the lights or shift the color from warm to cool. You might see two types: warm dim (gets warmer as it dims) and selectable color temperature (lets you pick any color temperature and brightness).
Selectable color LEDs mix different colors on one board. You control both color and intensity with separate dimmers.
For the best color, pick LEDs with a high Color Rendering Index (CRI), like 92 or higher. This helps your graphics and photos look true to life.
If you want even lighting, plan your LED layout. Space the strips evenly and avoid putting them too close together or too far apart. You can use a table to help figure out how many lumens you need:
Room Size (sq ft) | Recommended Lumens (70-100 lm/ft²) |
|---|---|
10 | 700-1000 |
20 | 1400-2000 |
30 | 2100-3000 |
Try different settings until your display looks perfect. Don’t forget to show off your new lightbox to friends and family!
Troubleshooting Lightbox
Common Issues
You might run into a few bumps when you install or use your light box. Don’t worry—most problems have simple fixes. Here are some of the most common issues people face:
Moisture getting inside: Water can sneak in and cause damage. To stop this, use weatherproof boxes with seals and gaskets. Apply silicone caulk around the edges and mount your light box at least 12 inches above the ground.
Loose or improper wiring: If your lights flicker or don’t turn on, check your wiring. Use wire nuts or crimp connectors, and make sure you twist and strip wires properly. Always ground your light box to keep it safe.
Poor weatherproofing: Outdoor light boxes need extra care. Pick materials that can handle rain and sun. Make sure all parts are sealed tight.
Not following electrical codes: Always follow local rules like the NEC. Use GFCI protection and keep the right clearance around your box. If you feel unsure, call a licensed electrician.
Choosing the wrong materials: Pick moisture-resistant wires and sturdy frames. This helps your light box last longer.
If you ever feel stuck, a professional electrician can help you fix tricky wiring or mounting problems.
Maintenance
Keeping your light box in top shape is easy if you follow a few simple steps:
Check your light box every month. Look for even lighting, tight fabric, and safe wires.
Clean the fabric weekly. Use a soft cloth or vacuum. Wash graphics by hand in cold water and let them air dry.
Wipe the frame with a damp cloth. Avoid harsh cleaners. Dust inside the LED channels to keep lights bright.
Replace any broken LED modules right away.
Store extra graphics rolled up and in labeled sleeves. Don’t stack heavy things on them.
Twice a year, ask a pro to inspect large displays. They can spot problems you might miss.
Use smart power tools like dimmers and surge protectors. This saves energy and protects your light box.
If you live in a humid or dusty place, pick anti-moisture fabrics and powder-coated frames.
When you need to get rid of old parts, recycle bulbs and metal frames. Some bulbs, like CFLs, need special disposal to protect the environment. Always check your local rules for recycling.
You just learned how to install a frame with a light box. This project gives your space a fresh look and better ambiance. Here are some great benefits you get:
High visibility day and night.
Custom designs for any style.
Easy setup and lasting quality. Take pride in your work and always stay safe!
FAQ
How do I clean my light box frame?
Use a soft, damp cloth to wipe the frame. Avoid harsh cleaners. For dust, a gentle vacuum or microfiber cloth works best.
Can I use my light box outdoors?
Yes, you can! Pick weatherproof materials and seal all edges. Keep your light box at least 12 inches above the ground to avoid water damage.
What should I do if my LEDs stop working?
First, check the power supply and wiring. Replace any broken LED strips. If you still have trouble, ask a licensed electrician for help.
See Also
LED Light Box Wall Mounts: Types, Uses, And Installation
Comparing Frameless And Framed Acrylic LED Light Boxes
How To Choose The Best Acrylic Light Box Frame 2025
Designing And Installing Custom Acrylic Light Boxes Explained
