DIY LED Light Box Display

If you want a fun way to brighten up your space, try building a diy led light box. You can make an led light box that fits your style and shows off your favorite art or photos. Many people love a lightbox because it brings a soft, even glow to any room. You get to choose the size and look of your diy led light box, which means your lightbox is one of a kind. You do not need special skills for this project. You can finish your diy led light box in just a couple of hours. When you make an led light box, you save money and get a custom lightbox that works for you. Use your lightbox to display posters, trace drawings, or just add cool vibes. Grab your supplies and start your diy led light box today. You will love how your lightbox turns out!
Key Takeaways
Making a DIY LED light box is a fun project. You can finish it in about two hours. Pick good materials like plywood, acrylic sheets, and LED strips. This will help your light box look nice and last longer. Careful planning and measuring are very important. This helps everything fit well and stops gaps. It also makes the lighting even. You can make your light box special with colors, shapes, and messages. This shows your style and makes your room look better. Always follow safety tips when you build it. Check all connections and use a voltage tester. This keeps your light box safe and working well.
Materials and Tools for a DIY LED Light Box
Materials List
You want your diy led light box to look great and last a long time. Here’s a handy table to help you pick the right materials:
Material | Description |
|---|---|
Plywood or MDF | Use 1/2" or 3/4" plywood or MDF for the frame and back support. |
Choose a 3mm (1/8") opaline acrylic sheet for the front panel. | |
Aluminum Tape | Line the inside with aluminum tape for better light reflection. |
led strip | Place these on the inside edges for even, bright lighting. |
Adhesive | Use glue or double-sided tape to hold panels and frame together. |
Power Supply | Make sure it matches your led strip voltage and wattage. |
You can swap plywood for solid wood or even lightweight metal if you want a different look.
Tools Needed
You don’t need fancy tools to build your light box. Most of these you probably already have at home:
Saw (hand saw or miter saw)
Scissors
Tape measure or caliper
Wire cutters and needle-nose pliers
Soldering iron and solder (for connecting the led strip)
Electrical tape
Screwdriver
Glue or double-sided tape
Tip: If you want to avoid soldering, look for led strip easy connectors. They snap on and save time!
Budget and Sourcing Tips
You can build a diy led light box without spending a lot. A led strip set from Ikea costs about $25. Acrylic sheets and plywood are easy to find at hardware stores or online. Check your local hardware store’s scrap bin for small pieces of wood or acrylic. Sometimes you can get these for free or at a big discount. For the led strip, shop online for deals or use leftovers from another project. You can also use double-sided tape instead of glue for easy assembly and changes later.
Note: Always double-check that your power supply matches your led strip to keep things safe.
How to Make an LED Light Box
Planning and Measuring
Before you start building, take a few minutes to plan your lightbox. Decide how big you want it to be. Do you want a small box for tracing, or a large one for posters? Grab your tape measure and sketch out your design on paper. Accurate measurements make a huge difference. When you measure carefully, every part fits together perfectly. This helps your lightbox shine evenly and look professional. You avoid gaps and shadows, which means your photos or artwork will look their best.
Define the lightbox size so all pieces fit together.
Use precise measurements when cutting materials to avoid misalignment.
Take your time with this step. Double-check your numbers before moving on to cutting all pieces to size.
Cutting and Assembling the Frame
Now it’s time to cut your materials. Start with the wood for the frame and the acrylic for the front panel. Here are some best practices to help you get clean, accurate cuts:
Confirm the thickness of your acrylic sheet before you cut.
Use a carbide tip blade for thick acrylic sheets. For thin sheets, a sharp blade works best.
Go slowly and check the fit as you cut. This helps you avoid gaps and keeps seams clean.
Cut channels for the acrylic using the sheet itself as a guide.
Set your saw blade to reach halfway through the wood when making channels.
Align the saw fence closely to the channels for accurate cuts.
After cutting the channels, separate the wood pieces and cut 45-degree miters for the corners.
For straight cuts, a circular saw with the right blade works well. If you have access to a dedicated acrylic table saw, use a Tenyru acrylic blade for the smoothest results. Avoid regular woodworking blades, as they can chip the acrylic.
Once you have all your pieces, start assembling the lightbox frame. Dry-fit everything first to make sure it lines up. This step helps you spot any problems before you glue or screw things together.
Reinforcing and Gluing
A strong frame keeps your lightbox looking good for years. Reinforcing the corners is key. This keeps the frame square and stable, which helps with even lighting and makes sure your art or photos display correctly.
Reinforcing corners maintains the frame’s structure.
It prevents warping and keeps everything aligned.
For the joints, lap joints and box joints work best. They give your frame extra strength and support, especially for larger lightboxes.
When it’s time to glue, pick the right adhesive for the job. Here’s a quick table to help you choose:
Adhesive Type | Notes |
|---|---|
Flexible 2-part epoxy | Cheap, long shelf life, and works for many materials. |
Hot glue | Not recommended. It can be corrosive and may not last. |
Neutral cure silicon | Good for some parts, but avoid near electronics. |
Loctite Super Bonder | Great for surface mount technology and small parts. |
Apply glue to the joints and clamp the frame until it dries. If you want extra strength, add small corner brackets inside the frame.
Installing LED Lights
With your frame ready, you can move on to the installation of the LED strips. Choose energy-efficient strips for the best results. Here’s a quick look at two great options:
Type of LED Strip | Luminous Efficacy (lm/W) | Advantages |
|---|---|---|
Backlit Rigid LED Strip | 150 | High brightness, even light, easy installation, flexible size |
Edge-lit Rigid LED Strip | 150 | High brightness, energy-saving, even output, space-saving, simple structure |
Stick the LED strips along the inside edges of your frame. Make sure the strips are evenly spaced. This helps your lightbox glow without dark spots or harsh lines. Use aluminum tape inside the frame to reflect more light and boost brightness.
Tip: Test your LED strips before final installation. Plug them in and check for even lighting.
Adding the Diffuser Panel
A diffuser panel softens the light and gives your lightbox that smooth, professional look. The best materials for this are sanded (or iced) acrylic, PMMA, or polycarbonate. These materials spread the light and reduce glare.
Sanded acrylic works great as a diffuser.
Polycarbonate is another good choice for softening LED light.
Slide the diffuser panel into the channels you cut earlier. Make sure it fits snugly so it won’t move around.
Wiring and Power
Wiring your lightbox safely is very important. Use a UL listed power supply that matches your LED strip’s voltage and wattage. For most small to medium lightboxes, a 12V or 24V power supply works well. Here’s a quick table to help you pick:
Voltage | Current Options | Description |
|---|---|---|
12V | 1A, 2A, 3A, 5A, 6A, 8A, 10A | Good for small installations, like one 5-meter LED strip. |
24V | 2A, 3A, 4A, 5A | Great for low wattage strips and longer runs. |
Use 18 AWG or thicker wire for safe connections. If you want extra brightness, run a long wire alongside the LED strip and tap into it every few feet. You can also make “home runs” from the power supply to different parts of the strip. Always test your connections before you close up the box.
Note: Using 5 volt LEDs can make your lightbox even safer. Always double-check your wiring before plugging in.
Final Assembly and Testing
You’re almost done! Place the back panel onto your lightbox and secure it with screws or glue. Make sure everything feels sturdy. Plug in your lightbox and turn it on. Check for even lighting and make sure there are no dark spots or flickering.
If you see any problems, open the box and adjust the LED strips or wiring. Once you’re happy with the results, your lightbox is ready to use! You can hang it on the wall, set it on a table, or use it for photography.
Assembling the lightbox usually takes about two hours from start to finish. Take your time and enjoy the process. You’ll end up with a custom lightbox that fits your needs and style.
Lightbox Customization Ideas
Creative Uses
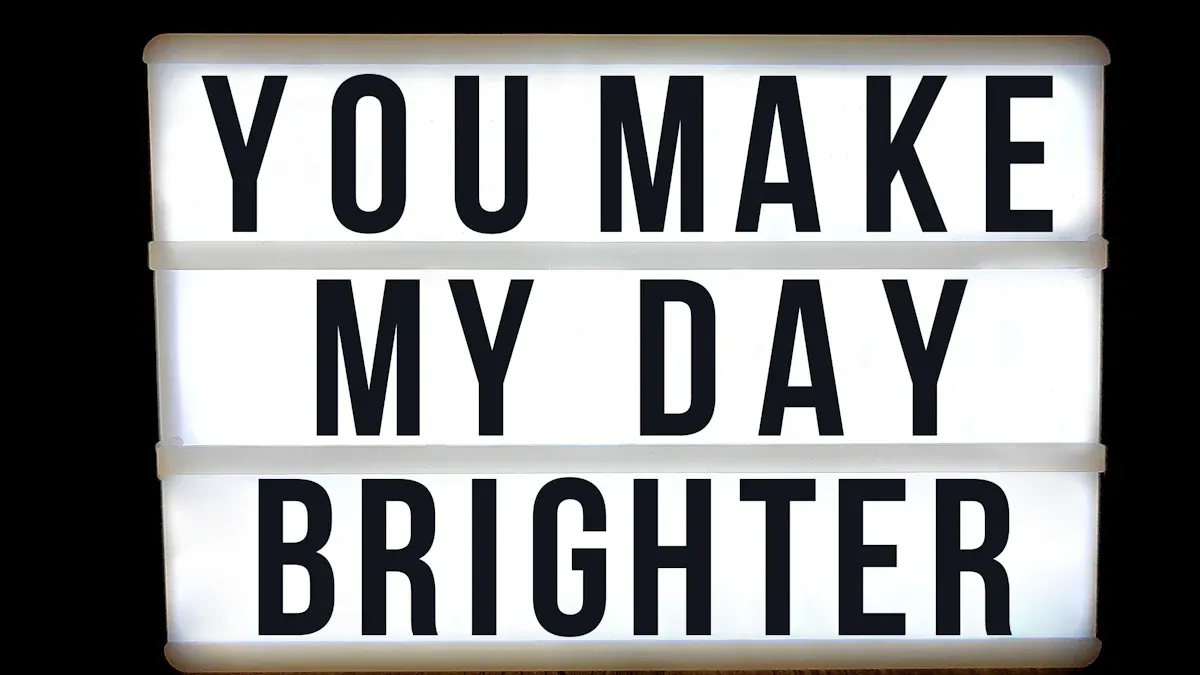
You can use your lightbox in so many fun ways. A lightbox sign can turn any room into a gallery. You might want to show off your favorite artwork or create a glowing poster display. Many people use a lightbox sign to share personalized messages. You can write a quote, a birthday wish, or even a joke. Your lightbox sign can also help set the mood in your space. If you want a cozy vibe, try soft colors. For a party, use bright shades. Some people use a lightbox sign for tracing drawings or making illuminated displays for crafts. You can even use your lightbox sign as a backlit canvas for painting. If you want to advertise a special event, a lightbox sign grabs attention. You can hang your lightbox sign in your window or on your wall. It works great for home decor, art display, or as a unique nightlight.
Tip: Try using your lightbox sign to highlight a collection of photos. You can swap out the images whenever you want.
Personalizing Your Lightbox
Designing your lightbox sign lets you show your style. You can pick the colors, shapes, and size that fit your room. Some people paint the frame or add stickers. You can use colored acrylic for the front panel or add patterns with vinyl. If you want to move your lightbox sign around, try a battery-powered setup. This makes your lightbox sign portable and easy to use anywhere. You can also add a dimmer switch to control the brightness. Some people like to use their lightbox sign for seasonal decorations. Change the message or artwork for holidays. You can even make a lightbox sign that looks like a movie marquee. If you want to get creative, try making a lightbox sign in a fun shape, like a star or heart. Your lightbox sign can match your personality and make your space feel special.
Customization Idea | How to Do It |
|---|---|
Colored acrylic | Swap out the front panel |
Battery-powered | Use rechargeable batteries |
Backlit canvas | Paint on frosted acrylic |
Dimmer switch | Add an inline dimmer |
Fun shapes | Cut frame in star or heart shape |
You can make your lightbox sign as simple or as fancy as you want. The best part is that you get to decide every detail.
Troubleshooting and Tips for LED Light Boxes
Common Issues
You want your lightbox to work well every time. Sometimes, problems can make your lightbox look or work badly. Here is a table that lists common problems, what causes them, and how to fix them:
Problem | Causes | Solutions |
|---|---|---|
Uneven Lighting or Hotspots | Improper LED alignment, insufficient diffusion, or defective LEDs. | Reposition LED strips, upgrade diffuser, replace faulty LEDs. |
Flickering or Pulsing Lights | Inadequate power supply, incompatible LED drivers, or electromagnetic interference. | Stabilize power supply, upgrade LED drivers, implement EMI measures. |
Premature LED Failure | Overheating, poor electrical connections, or substandard LEDs. | Enhance ventilation, check electrical connections, use quality LEDs. |
Discoloration or Fading of Graphics | Exposure to UV light, low-quality print materials, or adverse environmental conditions. | Use UV-resistant materials, high-quality printing, control environment. |
Connectivity and Control Issues | Network configuration errors, incompatible control systems, or faulty interfaces. | Ensure proper configuration, update control systems, troubleshoot interfaces. |
If your lightbox has uneven lighting, try these ideas. Space the LED strips evenly inside the box. Pick LED strips that shine with the same brightness. Check the power so your lightbox does not get dim. Add a diffuser panel to mix the light and hide shadows.
When you fix these issues, your lightbox will look better and work well.
Safety Tips
Safety is important when you build or use a lightbox. You want to keep things safe and see clearly. Here is a table with safety steps for your lightbox:
Safety Precaution |
|---|
Always turn off the power before you start. |
Use a voltage tester to check for live wires. |
Make sure wire connections are tight and covered. |
Test everything when you finish. |
Double-check every connection before turning power on. |
Follow these tips for safe wiring and building. Use a voltage tester before touching any wires. Strip wires to the right length and push them in all the way. Tighten every connection so your lightbox does not flicker. Check the insulation so no bare wire shows. Make sure your lightbox is secure and will not fall.
To stop your lightbox from getting too hot, pick the right LED module and install it the right way. Give your lightbox enough air to cool down. You can use heat pipes or fans if it gets hot. Check your lightbox often and keep it clean for the best light.
Tip: Always test your lightbox before you use it. If you see flickering or dim spots, fix them fast. This keeps your lightbox bright and safe.
You just learned how to make your own lightbox from start to finish. This project lets you save money and show off your creativity. You can use your lightbox for art, photos, or even as a cool nightlight. People have made amazing things like 3D paper cut light boxes, exploding sun lamps, and stylish concrete lamps. Try building your own and share your results or questions below. Let your next DIY project shine bright!
3D paper cut light box for home decor or gifts
Exploding sun LED lamp for creative lighting
Concrete and acrylic LED lamp with a wooden base
FAQ
How long does it take to build a DIY LED light box?
Most people finish in about two hours. If you measure and plan first, you save time later. You can take breaks and work at your own pace.
Can I use battery power for my light box?
Yes! You can use rechargeable batteries for a portable light box. Make sure the battery matches your LED strip’s voltage. This way, you can move your light box anywhere.
What is the best material for the diffuser panel?
Sanded acrylic works best. It spreads the light and hides the LED strips. You can also use frosted polycarbonate or special light-diffusing plastic.
Do I need to solder the LED strips?
No, you do not have to solder. You can use snap-on connectors for most LED strips. These connectors make wiring fast and easy.
How do I fix dark spots in my light box?
Try spacing your LED strips evenly. Use a good diffuser panel. If you still see dark spots, add more LEDs or use reflective tape inside the frame.
See Also
Understanding The Basics Of LED Light Box Displays
Exploring Acrylic LED Light Boxes: Uses And Setup
Selecting The Ideal Wall-Mounted Display For LED Light Boxes
