Creating Stunning LED Light Box Art

You can create stunning led light box art right in your own space. So many people love a good diy project—did you know 71% of Americans call themselves crafters? Whether you want a customized paper cut light box or a diy shadow box, this art form lets you design something special. Animators, illustrators, and graphic designers all enjoy this fun home decor project. Ready to try a tutorial and light up your creativity?
Key Takeaways
Get the main supplies you need. You need LED strips, acrylic, and simple tools. These help you start your DIY light box project. Use layers in your design. This makes your art look deeper and more interesting. Mix different materials for cool effects. Paint the inside of your light box with light colors. This makes it brighter and gives a warm feeling. Test your LED lights before you finish building. This helps you check for even lighting and stops flickering. Try fun ways to show your art. You can use freestanding or wall-mounted light boxes.
DIY LED Light Box Materials
Essential Supplies List
You do not need fancy tools to start your diy led light box project. Most people already have some of the basics at home. Here’s what you’ll want to gather:
Screwdriver
Pliers
Utility knife
LED light strips or panels
Acrylic or plywood for the frame
Power supply and simple wiring parts
You can also use paper, cardboard, or even 3D printed pieces for different effects. Each material gives your art a unique look. If you want a modern style, try acrylic. For a softer, handmade feel, paper works great.
Tip: LED lighting is not only bright and colorful, but it is also safer for the environment. It does not have toxic chemicals like mercury, and it uses less energy. This means you help the planet while making cool art!
Budget-Friendly Options
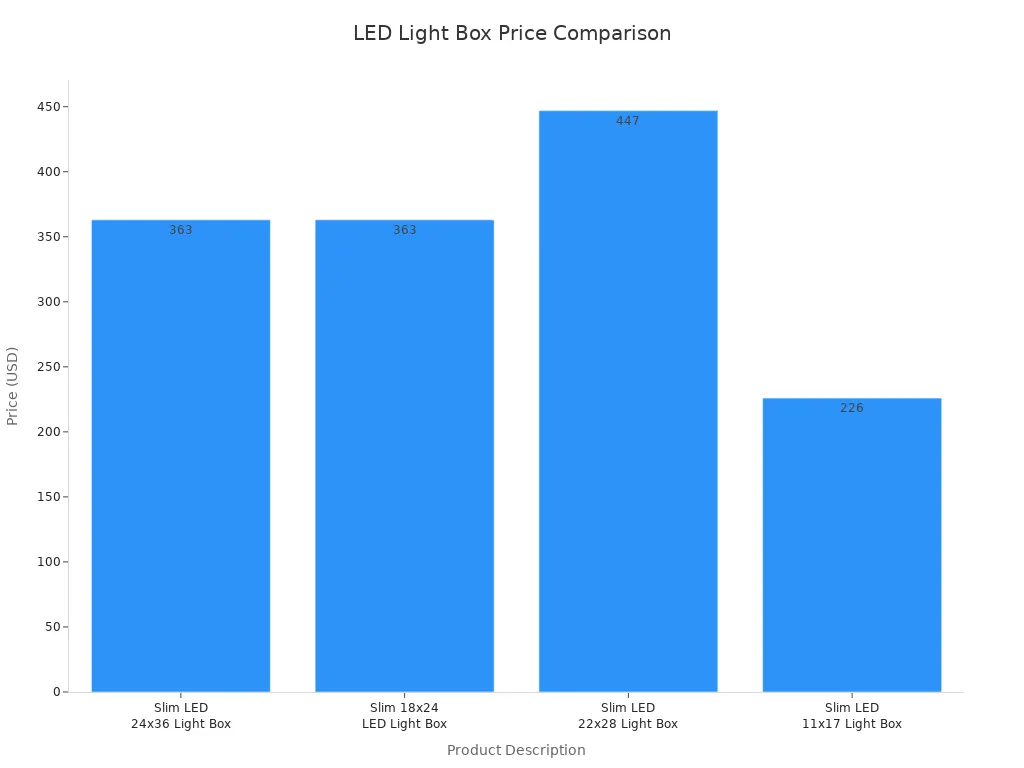
You do not have to spend a lot to make your own diy light box. Many supplies cost less than you think. Here’s a quick look at some prices for ready-made light boxes:
Product Description | Price |
|---|---|
Slim LED 24x36 Light Box | From $363 |
Slim 18x24 LED Light Box | From $363 |
Slim LED 22x28 Light Box | From $447 |
Slim LED 11x17 Light Box | From $226 |
Want to save even more? Try these diy ideas:
Use cardboard or foam board instead of acrylic.
Check out Customizable Light Box for a simple project using led strips.
Look for light tables and boxes at art supply stores for more choices.
Where to Find Materials
You can find diy supplies almost anywhere. Local hardware stores, craft shops, and online sellers all have what you need. Here’s one place to start:
Store Name | Address | Phone Number | Store Hours |
|---|---|---|---|
6672 Westminster Blvd, Westminster, CA 92683 | (714) 891 - 3626 | 10:00 am - 6:00 pm PST |
Online shops often have deals on led strips and art materials. You can also reuse old frames or boxes from home. This keeps your project budget-friendly and eco-friendly.
Designing Stunning LED Light Box Art
Choosing or Creating Artwork
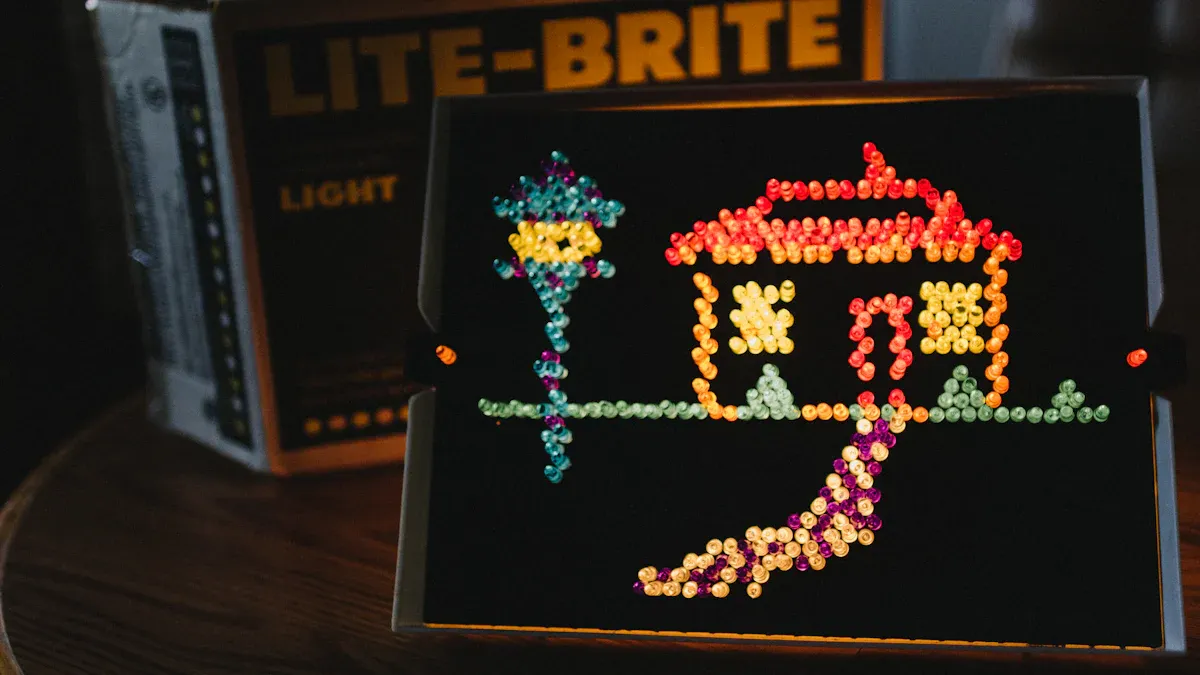
You get to decide what goes inside your stunning led light box art. Some people like to use their own drawings. Others search for templates online. You can find inspiration from places like LED Lightbox Designs or the Lightboxes and Banner Stands Gallery. These sources show bright graphics and customizable ideas. If you want a classic look, try a paper cut light box. You can draw your own shapes or print patterns. Many artists use animals, city scenes, or fantasy worlds. You can even make a layered paper light box with your favorite cartoon characters.
Layering for Depth and Visual Impact
Layers make your diy project pop. When you stack design layers, you create depth and cool shadows. You can use glossy, matte, or translucent paper for different effects. Try adjusting the distance between layers and the light source. This can make some parts glow softly while others shine bright. Directional lighting helps guide the viewer’s eye to special spots. Backlighting and edge lighting add gradients and make your artwork look like it’s floating. If you want your stunning led light box art to stand out, focus on how you place your layers. Each layer changes the way light moves through your paper cut light box.
Tip: Use at least three design layers for a more dramatic look. Mix materials to highlight certain parts of your paper cut light box.
Preparing Templates
Templates help you plan your diy project. You can sketch your own or download ready-made ones. Many artists start with simple shapes and add details to each layer. When you prepare your design layers, think about how light will pass through each part. Cut out windows, stars, or waves in your paper cut light box to let light shine through. You can use a utility knife or a cutting machine for clean edges. Organize your layers before you glue or tape them together. This makes assembly easier and helps you spot any changes you want to make. Your stunning led light box art will look amazing when you take time to prepare your design layers.
How to Make an LED Light Box
Cutting and Preparing Materials
You want your diy project to look sharp and last a long time. Start by measuring your frame and backing. Use a ruler and pencil to mark where you need to cut. If you use acrylic or plywood, score the lines with a utility knife or saw. For paper or cardboard, scissors work well. Cut your layers carefully so each piece fits inside the frame. Make sure every layer matches your design. You can use templates to trace shapes and details. Stack your layers in order before moving on. This step helps you see how the light will travel through your led light box.
Tip: Always wear safety glasses when cutting hard materials like acrylic or wood. Keep your workspace clean and organized.
Painting the Box Interior
Painting the inside of your box makes a huge difference. You want the light to bounce around and fill every corner. Use white or light-colored paint for the best results. Reflective surfaces help spread the light and make your art look brighter. Lighter colors reflect more light, so your layers glow evenly. You can add visual warmth with certain light colors. Let the paint dry before you add any layers or led strips.
Light colors help paint reflect more light.
You get a warmer, more inviting look with the right paint and lighting.
Assembling Layers and Frame
Now you get to build your diy masterpiece. Place your background layer first. Add each layer on top, leaving a small gap between them. You can use foam spacers, double-sided tape, or thin strips of cardboard. This space lets the light move through each layer and creates depth. Make sure your layers line up with your design. Secure the frame with screws or glue. Check that everything feels sturdy and safe.
Here’s a quick table to help you organize your assembly:
Step | What to Do | Tools Needed |
|---|---|---|
Place background | Set the first layer in the frame | Tape, glue |
Add layers | Stack each layer with spacers | Foam, tape |
Secure frame | Attach sides and corners | Screwdriver, glue |
Note: Don’t rush this part. If you skip steps or use the wrong materials, you might get uneven lighting or loose layers.
Installing LED Lights
You’re almost done with your diy led light box. Choose led strips or panels that fit your frame. Make sure the wattage matches your box size. For example, a 24" x 36" box needs about 28.8 watts. Use the formula: wattage = 4.8 x (total length of led strip in feet). Check the voltage before you connect anything. Look for cracks or exposed wires. Only use led devices that match your project’s voltage and size.
Make sure the led device fits your box.
Keep fixtures away from kids and pets.
Match the voltage before turning on the power.
Always turn off the power before replacing bulbs.
Attach the led strips along the inside edges or behind the layers. You can use adhesive backing or clips. Test the lights before you close the frame. If you see flickering or uneven brightness, check your wiring and connections. Avoid adding lights to existing poles without proper support. Bad wiring can cause electrical hazards, short circuits, or flickering lights.
Different led color temperatures change the mood of your art. Warm leds (around 3000K) give off yellow and orange tones. This makes your light box feel cozy. Cool leds (6000-7000K) create blue and white tones for a more energetic look. The color temperature affects how your layers and graphics appear. Pick the one that matches your design and the atmosphere you want.
You just learned how to make an led light box with clear instructions. Your diy project will shine with the right layers, paint, and led setup.
Light Box Tutorial: Finishing Touches
Powering and Testing
You are almost done with your light box. Now you need to turn it on and see how it looks. Follow these easy steps to connect your led lights the right way:
Take off the plastic from the ends of your led wires.
Look for the plus and minus signs on the led strip and power supply.
Attach the wires to the power supply. Put the positive wire in the plus spot and the negative wire in the minus spot. If you have a DC jack, just plug them together. If you have bare wires, use connectors or solder them.
Cover any bare wires with tape or heat shrink.
Check your work. Make sure everything is tight, then plug in the power and watch your layers light up.
This light box tutorial helps you avoid mistakes and keeps your project safe. If all your layers glow evenly, you did a great job!
Troubleshooting Common Issues
Sometimes things do not work as planned. You might see dark spots, flickering, or shadows in your light box. Here is a table to help you fix these problems:
Problem | Causes | Solutions |
|---|---|---|
Uneven Lighting or Hotspots | Led strips are not lined up, not enough diffusion, or bad leds. | Move led strips, add a better diffuser, or change out bad leds. |
Weak power, bad drivers, or interference. | Use a stronger power supply, get better drivers, or add EMI protection. | |
Premature led Failure | Too much heat, loose wires, or cheap leds. | Add more airflow, check wires, or use better leds. |
Discoloration or Fading | UV light, bad prints, or a poor environment. | Use UV-safe materials, better prints, or keep your box in a good place. |
Connectivity Issues | Wrong setup, bad controls, or broken parts. | Fix the setup, update controls, or check the connections. |
If you see shadows or dark spots, try these tips:
Move your led strips to new places for better light.
Put lights at an angle to make shadows softer.
Use mirrors or shiny paper to bounce light into dark spots.
This light box tutorial gives you ways to fix most problems quickly.
Creative Display and Light Painting Ideas
You finished your light box, so now you can show it off! Try these fun ways to display your art:
Display Type | Description |
|---|---|
Freestanding Lightboxes | These stand on their own and let people look at your art up close. |
Suspended Lightboxes | Hang your light box from the ceiling for a cool floating look. |
Wall-Mounted Lightboxes | Put your light box on the wall to make a glowing window or art collage. |
Want to make your art even cooler? Try light painting! Move your light box in a dark room and take a photo with a slow camera shutter. The glowing layers will make bright trails and shapes. You can also swap out layers or change your design for different seasons or moods. This light box tutorial helps you try new ideas and keep your art interesting.
Keep your light box clean and turn it off when you are not using it. This will help your layers and leds last longer. With this light box tutorial, you can enjoy your project for a long time and keep making new art.
You can jump into diy projects and create your own LED light box art. Making diy art feels rewarding and fun. Try new diy techniques to see how different lighting, backgrounds, or accessories change your results. You might use a reflector for a soft glow or pick a bold background to make your design pop. Share your diy creations with friends or online. Every experiment opens up new creative possibilities!
Try different backgrounds for unique effects.
Use reflectors or colored gels to add mood.
FAQ
How long does it take to make an LED light box?
Most people finish a simple light box in two to four hours. If you add more layers or details, you might need a whole afternoon. Take your time and enjoy the process!
Can I use regular lights instead of LEDs?
You can try, but LEDs work best. They stay cool, use less power, and last longer. Regular bulbs might get too hot and could damage your art.
What kind of paper works best for layered designs?
Heavyweight paper or cardstock gives you crisp edges and holds its shape. You can also use translucent vellum for a soft, glowing effect. Mix different papers for unique results.
Is it safe for kids to help with this project?
Kids can help with design and assembly. Adults should handle cutting and wiring. Always supervise children and keep sharp tools and wires out of reach.
How do I change the artwork inside my light box?
You can open the frame and swap out the layers. Use removable tape or spacers for easy changes. This way, you can update your art for holidays or special events.
See Also
Creating Stunning Acrylic Light Box Display Designs
Crafting The Perfect Light Box For Acrylic Art Displays
Understanding The Concept Of LED Light Box Displays
