The Complete Guide to Lighted Photo Boxes


A lighted photo box, also called a lightbox, helps you take clear and bright pictures. It gives you even lighting. You can use a light box for taking pictures of products. You can also use it for drawing or tracing. Many artists and designers like these boxes. They help stop your eyes from getting tired. They also let you control shadows. You can buy boxes with lights inside or outside. You can even make one at home. The Complete Guide will show you how these tools help your creative work.
Key Benefits:
Benefit
Description
Even Lighting
Gives steady light for good pictures and easy checking.
Reduced Eye Strain
Lets you work longer without your eyes hurting.
Shadow Manipulation
Lets you choose how your subject looks with shadows.
Key Takeaways
Lighted photo boxes give even light. This helps stop strong shadows and makes photos clearer. Using a lightbox can help your eyes feel less tired. You can work longer without feeling pain. You can make your own lightbox at home. Use easy things like a cardboard box and LED lights. Picking the right lightbox with settings you can change can make your photos better. Trying different ways to use light can make your photos look cool and show your creative side.
Lightbox Photography Basics
What Is a Light Box?
You might wonder what makes a light box so special in lightbox photography. A light box is a simple tool that helps you control light when you take pictures. It looks like a small box with bright lights inside. The inside of the box has shiny or white surfaces. These surfaces bounce light around and make it soft. This soft light covers your subject from all sides. You get fewer harsh shadows and more even lighting. That’s why many people use a light box for lightbox photography. You can use it for small items like jewelry, toys, or food.
Why Use a Lightbox?
Lightbox photography gives you a big advantage. You get to control the lighting every time you take a photo. The lightbox creates a space where you can change the brightness and direction of the light. This helps you show off details and colors. You can try different setups and see what looks best. Here’s what you get with a lightbox:
Even lighting for your subject, which is important in lightbox photography.
The chance to play with different lighting setups.
The ability to highlight special features by changing the light’s strength or angle.
If you want your photos to look sharp and professional, lightbox photography is a great choice.
Lightbox vs. Photography Light Box
Not all light boxes are the same. Some are made for tracing or drawing. Others are built just for lightbox photography. A general light box might not have adjustable lights or places for your camera. A photography light box gives you more control. It often has built-in lights and easy ways to set up your camera. You can change the lighting to fit your needs. This makes lightbox photography easier and more fun. If you want the best results, pick a photography light box for your photos.
Types of Light Boxes
Built-In vs. External Lighting
When you look for a lightbox, you’ll notice two main lighting styles. Some light boxes have built-in lights. These make setup quick and easy. You just plug in the box and start shooting. Other lightboxes use external lights. You place lamps or LED strips around the box. This gives you more control over brightness and shadows. If you want simple use, built-in lighting works well. If you like to experiment, external lighting lets you change things up.
Tip: Try both styles if you can. You might find that one fits your workflow better.
Foldable and Rigid Designs
Lightboxes come in foldable and rigid designs. Foldable light boxes are easy to store and carry. You can set them up fast and pack them away when you finish. Rigid boxes stay strong and keep their shape. They protect your items and last longer. Here’s a quick look at how they compare:
Criteria | Folding Cartons | Rigid Boxes |
|---|---|---|
Structural Integrity | Lightweight and versatile; struggles with heavy items | Sturdy and luxurious; maintains shape for protection |
Printing Capabilities | High-quality graphics; constraints on finishes | Exceptional options; higher costs for elaborate designs |
Cost-Effectiveness | Economical for large runs; shorter lead times | Premium solution; higher costs and lead times |
Environmental Impact | Recyclable materials; sustainable practices | Challenges in recycling; complex materials |
DIY Light Box Options
You don’t need to buy a fancy lightbox. You can make your own at home. Grab a few household items and get creative. Here’s what you’ll need:
Cardboard box
Tissue paper
Craft knife
Packing tape
White posterboard (at least 30% longer than the box length)
3/16" foam board
LED under cabinet light pods
18" cube
Cut holes in the box, cover them with tissue paper, and place your lights outside. You now have a homemade light box for your photos.
Specialty Light Boxes
Some lightboxes are made for special jobs. You’ll find boxes for jewelry, food, and even large products. These specialty light boxes help you get the best results for each type of subject. If you want to shoot shiny rings or tasty snacks, look for a box made just for that purpose.
Note: Specialty lightboxes can make your photos stand out. They add the right touch for unique items.
Choosing a Photography Light Box
Key Features to Consider
When you pick out a photography light box, you want to make sure it fits your needs. Some features matter more than others. Here’s a table to help you see what to look for:
Feature | Description |
|---|---|
Lux output (brightness) | Check if the brightness matches your photo needs. |
UV filtering | Protects your eyes and keeps your items safe from UV rays. |
Adjustable settings | Lets you change the light’s strength and color temperature. |
Size and portability | Think about how big the box is and if you need to move it often. |
Energy efficiency | Saves power while still giving you enough light. |
Color rendering index (CRI) | High CRI means your photos show true colors. |
Background options | Some boxes come with different backgrounds for more photo styles. |
Positions for taking pictures | Multiple openings let you shoot from different angles. |
Tip: Always check if the photography light box has adjustable settings. This gives you more control over your photos.
Size and Portability
You need to think about the size of your photography light box. Small boxes work well for things like jewelry or small gadgets. They give you steady lighting and are easy to use. If you want to photograph bigger items, a larger box gives you more space to move things around. You can control shadows and highlights better with a bigger box.
Small light boxes are great for quick product shots.
Large light boxes help you capture more detail and let you try different angles.
If you travel a lot, pick a box that is light and easy to carry. Some models, like the FJ200, weigh only 2.5 lbs and set up fast. You can take them anywhere, which is perfect for street or travel photography.
Note: Many online sellers and hobbyists use light boxes for e-commerce photos. You can get clear images of jewelry, electronics, or clothes without much effort.
Lighting Types
The type of lighting in your photography light box can change how your photos look. Most boxes use diffused lighting. This softens shadows and makes your subject look smooth. Sometimes, this can hide small details or make textures look flat. Professional setups let you adjust the light to show off sharp details and true colors.
Aspect | Lightbox Photography | Professional Lighting Setup |
|---|---|---|
Detail and Clarity | Soft lighting can blur fine details. | Adjustable lighting brings out sharpness and detail. |
Color Accuracy | Neutral lighting may not always show true colors. | High-quality lights give you better color accuracy. |
Texture and Material | Soft light can make textures look flat. | Directional lighting shows off textures and shine. |
If you want more control, look for a photography light box with adjustable brightness and color temperature. This helps you match the lighting to your subject.
Versatility for Creative Projects
A good photography light box lets you do more than just take product photos. You can use it for art, crafts, or even DIY projects. Some boxes let you swap backgrounds or change the lighting style. This helps you get creative and try new ideas.
Save money by picking a box that fits many uses.
Change the size, brightness, or design to match your project.
Use your photography light box for crafts, art, or even as a cool display for your favorite items.
Callout: A versatile lightbox helps you express your creativity. You can make your photos stand out and add your own style.
Complete Guide to Lightbox Setup
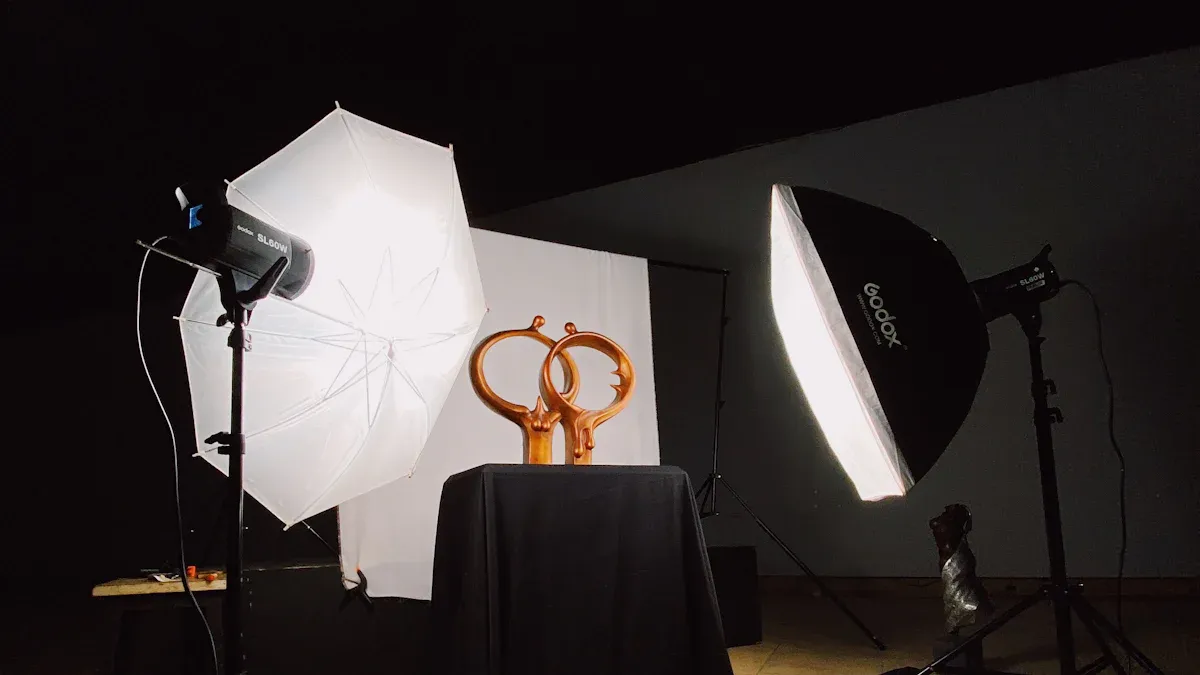
Setting up your lightbox the right way makes a huge difference. If you want to master lightbox photography, you need to follow a few simple steps. This complete guide will walk you through everything you need to know, from setup to camera settings. You’ll learn how to avoid common mistakes and get excellent product images every time.
Setup Steps
You don’t need to feel overwhelmed when you set up your photo light box. Just follow these steps, and you’ll be ready to start creating professional product images:
Assemble your light box. Make sure all the parts are there before you start.
Place your lightbox on a sturdy table. A stable surface keeps your shots sharp.
Check your seamless background. It should be clean and free from marks or dirt.
Clean your product. Wipe away dust or fingerprints so nothing distracts from your shot.
Put your product in the center of the light box. Leave a few inches between your item and the background.
Turn on your lighting. Make sure the light hits your subject evenly from the front and all sides.
Set your camera on a tripod. This keeps your camera steady and your images crisp.
Tip: Always double-check your setup before you start shooting. A quick check saves you time and helps you get high-quality product photography results.
Positioning and Lighting Tips
Lighting can make or break your photos. If you want to master your lightbox photography skills, you need to control shadows and highlights. Here are some tips to help you get the most out of your portable photo studio lightbox:
Adjust your light sources to remove harsh shadows. Move the lights around until you see a soft, even glow.
Try different angles and intensities. Sometimes, a small change in position can make your subject pop.
Use LED panel lights with multiple points of light. This spreads the lighting and reduces dark spots.
Add soft boxes or diffusion paper in front of your lights. These tools soften the light and help you avoid strong shadows.
If you use spotlights, adjust their focus or add diffusion material. This creates a gentle, scattered light that flatters your subject.
Altering the quality of light from strong to soft is key. Soft, diffused lighting gives you a balanced look and helps you showcase your products in the best way. If you want to show off textures or shiny surfaces, try moving your lights or adding extra diffusion. You’ll soon find the perfect setup for your photo light tent.
Note: The right lighting setup is the secret to showcasing lightbox photography and creating images that stand out.
Camera Settings
Your camera settings matter just as much as your lighting. If you want to get the most from your portable photo studio lightbox, try these settings:
Set your white balance using the inside of your soft box or a gray card. This keeps your colors true.
Shoot in RAW format. RAW files give you more control when you edit your photos later.
Use Aperture Priority or Manual mode. This lets you control how much of your subject stays in focus.
Set your aperture to f/11 for your first shots. Try f/16 or f/22 if you want more depth of field.
Keep your ISO as low as possible, around 100 or 200. Low ISO means less noise and sharper images.
Use center spot metering. This helps your camera expose your subject correctly.
Adjust your exposure with +EV or -EV if your image looks too bright or too dark.
Callout: A steady tripod and the right camera settings help you create high-quality product photography every time.
Common Mistakes
Even if you follow a complete guide, mistakes can happen. Here are some common problems people face with a professional-grade light box and how you can avoid them:
Skipping the instruction manual. Take a minute to read it. You’ll save time and avoid confusion.
Forgetting to check all the parts before assembly. Missing pieces can slow you down.
Leaving the fabric loose or wrinkled. Taut fabric looks better in your photos.
Placing your lights in the wrong spots. Make sure your lighting is even and covers your subject from all sides.
Ignoring cable management. Tidy cables keep your workspace safe and professional.
Picking the wrong spot for your setup. Choose a location with enough space and good access to power.
Not testing your setup before you start shooting. A quick test shot helps you catch problems early.
Alert: Don’t rush your setup. Taking a few extra minutes can help you avoid these mistakes and get the best results from your professional light box.
Now you have the complete guide to setting up your lightbox. With these steps, you can master your lightbox photography skills and create images that look like they came from a studio. Whether you use a photo light box or a photo light tent, you’ll find that careful setup and attention to detail make all the difference. Start experimenting, and soon you’ll be creating professional product images that wow your audience.
Lightbox Model Comparison
Best Overall Models
You want a lightbox that works well every time. Here are some top models that experts like:
Model Name | Rating | Key Features |
|---|---|---|
ESDDI Photo Studio Light Box | Overall Winner | Lightweight, strong, adjustable brightness, 30 shooting angles, high-quality LED lighting, waterproof. |
AmazonBasics Portable Foldable Photo Studio | Runner Up | Cheap, simple to use, built-in LED lights, good lighting, no setup needed. |
MyStudio MS20 | N/A | N/A |
SAMTIAN Photo Light Box | N/A | N/A |
Travor Photo Light Box | N/A | N/A |
Tip: If you want a lightbox you can trust, the ESDDI Photo Studio Light Box is flexible and has strong lighting.
Budget Options
You do not need to spend much for good photos. The Amazon Basics Portable Photo Studio Box gives you great results for less money. It has built-in LED lights and is quick to set up. If you are new to this, the LimoStudio LED Light Box is a good choice. It gives steady lighting and is easy to adjust, so it works well for e-commerce or hobbies.
Best for Product Photography
If you want clear product photos, the lightbox you pick is important. Here is a quick guide to what works best:
Light Box Type | Description | Recommendation |
|---|---|---|
White Translucent Box | Lets you use your own lights for soft, even lighting. | Best for soft light and flexibility. |
Box with External Lights | Has lights outside the box for better control. | Good, but not the top choice. |
Box with Integrated Lights | Lights are inside, which can cause harsh shadows. | Not recommended for best results. |
Note: A white translucent lightbox gives you the most control and helps you stop harsh shadows.
Pros and Cons
Each model has good and bad points. Here is a table to help you compare:
Model | Pros | Cons |
|---|---|---|
Artograph LightTracer 2 | Comfortable angle, pencil holder, bright light | No dimmer, costs more |
HSK Light Box | Long cord, big and bright, built-in ruler | Gets hot, metric ruler |
LITENERGY Portable A4 Tracing | Eye protection, USB powered, adjustable brightness, colorful frame | No USB adapter, not very bright |
Callout: Think about what features you need most. Some lightboxes are more comfortable or brighter, while others are cheaper or smaller.
Troubleshooting and Advanced Tips
Solving Lighting Issues
Sometimes, your lightbox might not work right. You could see uneven lighting or bright spots. The lights might flicker or your pictures could fade. Most problems have simple fixes if you know what causes them. Here’s a quick guide to common lighting problems and how to fix them:
Problem | Causes | Solutions |
|---|---|---|
Uneven Lighting or Hotspots | Improper LED alignment, weak diffusion, faulty LEDs | Move LED strips, upgrade the diffuser, swap out bad LEDs. |
Flickering or Pulsing Lights | Weak power supply, wrong LED drivers, interference | Use a stable power source, upgrade drivers, reduce interference. |
Premature LED Failure | Overheating, loose connections, poor-quality LEDs | Improve ventilation, check connections, use better LEDs. |
Discoloration or Fading of Graphics | UV exposure, low-quality prints, bad environment | Pick UV-resistant materials, print with quality, control the room’s conditions. |
Connectivity and Control Issues | Network errors, bad control systems, faulty interfaces | Fix network settings, update controls, troubleshoot interfaces. |
Tip: If your light looks uneven, move your LEDs or add more diffusion. This helps make your product photography look smooth.
Maintenance and Care
You want your lightbox to work well for a long time. Taking care of it helps a lot. Here’s a simple table to remind you what to do and when:
Maintenance Frequency | |
|---|---|
Daily | Wipe the outside and diffuser for clear light. |
Weekly | Check vents and make sure all wires are tight. |
Monthly | Look at LED panels and power supplies. Clean inside, especially shiny parts, for better lighting. |
Quarterly | Check all hardware and wires. Test every function, like dimming and controls. |
Annual | Change old parts. Adjust lights for steady performance. |
Callout: Clean your lightbox and check wires often. Good care keeps your lighting bright and your product photography sharp.
Creative Techniques
You can try new ideas with your lightbox to make cool photos. Different lighting tricks help your pictures look special. Here are some ideas you can use:
Technique | Description |
|---|---|
Side lighting | Shine light from the side to add depth and make your subject look three-dimensional. |
Overhead lighting | Place a soft box above for dramatic and soft illumination. |
Bare flash | Point a bare flash at your subject for strong, long shadows. |
Backlighting | Put light behind your subject to separate it from the background and create cool effects. |
Blocked lighting | Use black cards to block light and create mysterious beams of illumination. |
😊 Try mixing these lighting styles. You can make your product photography stand out and show off your creativity.
A photo box makes it easy to take great pictures. The lighting is even, so there are no strong shadows. You can see every detail in your photos. Many people like using light boxes because they work anywhere. The led lights can be changed to get the best look. If you want good reference photos, try different ways to use your lightbox. Start with two lamps, a tripod, and a plain background. Do not use the camera’s flash. Use aperture priority mode on your camera. The best photo boxes let you try new things. You can make your own or buy one that fits what you need. Soon, you will learn how to use lightbox photography for creative projects.
Photographers know a lightbox helps them take pro photos. If you want to impress others, a light box can really help your pictures.
FAQ
What can you use light boxes for besides photography?
You can use light boxes for tracing, drawing, and crafts. Many artists love them for sketching. Some people use light boxes to view slides or negatives. You can even use them for inspecting small items or teaching kids about light and shadows.
Do light boxes work for all types of photography?
Light boxes help with product photography, food shots, and small objects. You get even lighting and fewer shadows. For portraits or outdoor scenes, light boxes do not work well. You should use them when you want clear, detailed photos of smaller things.
How do you clean and care for your light boxes?
Wipe your light boxes with a soft, dry cloth. Keep dust away from the lights and surfaces. Do not use water or harsh cleaners. Store your light boxes in a cool, dry place. This keeps your photography setup ready for the next shoot.
Can you make your own light boxes at home?
Yes! You can build light boxes with a cardboard box, tissue paper, and LED lights. Many people enjoy DIY projects. Homemade light boxes work well for simple photography. You can save money and still get great results for your photos.
Why do your photos look better with light boxes?
Light boxes give you soft, even light. Your photos look sharp and bright. You see true colors and fewer harsh shadows. Many people use light boxes to make their photography look professional. You can show off details that normal lighting might hide.
See Also
Comprehensive Instructions for Acrylic Signs in Light Boxes
Captivating Photography Using Acrylic Light Boxes
Top 10 Acrylic Light Boxes for Beautiful Photo Displays
Key Elements for Achieving Professional Acrylic Light Box Results
Exploring Acrylic Light Boxes: Varieties, Advantages, and Uses
