The Ultimate Buyer's Guide: Selecting the Best LED Light Box for Photography

Choosing the best LED light box for photography starts with knowing what you want to shoot and how you want your images to look. When you match the right features—like size, lighting, and backdrops—to your style and budget, you get a controlled space with soft, even lighting. This setup helps you avoid harsh shadows and makes your photos look more professional. You also save time because good lighting means less editing later. With this Buyer's Guide, you can feel confident picking a light box that fits your needs.
Key Takeaways
Think about what you want to take pictures of before you buy a light box. Pick the right size and features for your photos.
Decide how much money you can spend. Most good light boxes cost between $50 and $300. Try to get good quality for your money.
Pick a light box that fits in your room. Get a portable one if you need to move it. Small ones are good for travel and tiny studios.
Find a light box with adjustable LED lighting. This helps you change shadows and highlights. Your photos will look better.
Always use a smooth white backdrop for product photos. It makes your pictures look professional. It also works well for selling things online.
Buyer's Guide: Key Decision Factors
Define Your Photography Needs
Think about what you want to take pictures of before you buy. Are you taking photos of small things, food, or close-up details? Your answer helps you choose the right features. If you take pictures of jewelry, you need a light box with lights on both sides and enough room for your items. If you take photos of small products, look for light that does not make shadows. Check out this table to see how different things can help you decide:
Factor | Description |
|---|---|
Size | Pick a size that fits your biggest item, with extra room. |
Get light that does not make shadows for small items. | |
Portability | Choose a small design if you need to move it. |
Intended Use Case | Think about what you want to take pictures of. |
This guide helps you match what you need with the best features. If you take pictures of many things, pick a light box that lets you change how you use it.
Set a Realistic Budget
You want good photos, but you also need to watch your spending. LED light boxes can cost less than $50 or almost $2,000. Most people find good choices between $50 and $300. Here is a chart that shows prices for popular models:
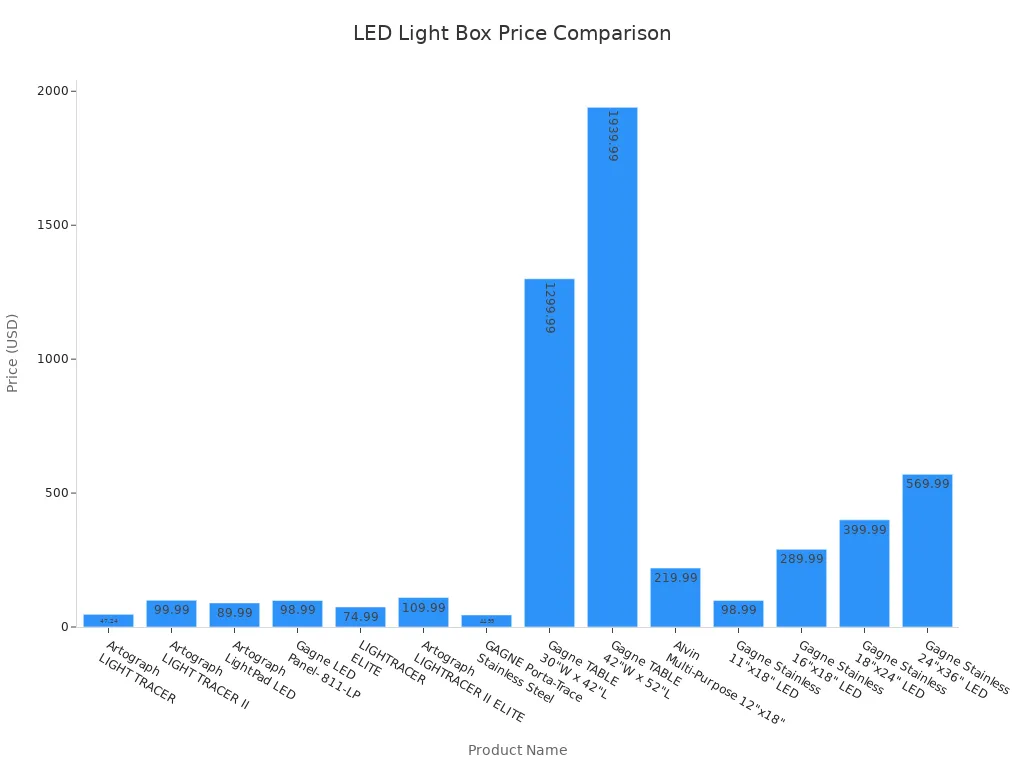
When you use this guide, look at prices and features. Sometimes, paying a bit more gives you better light and stronger build. Always check what comes with it, like extra backgrounds or brightness you can change.
Consider Space and Portability
Your workspace is important. If your studio is small or you travel, you need something easy to move. Small light boxes work well for jewelry and tiny items. Bigger boxes are good for large products. Some models, like the DUCLUS, are easy to carry and set up. The Amazon Basics Portable Photo Studio Box is good for bigger things. The Neewer 24 x 24 inch Photo Studio Tent folds up so you can move it fast. Use this guide to find the right size and how easy it is to move for your needs.
Tip: Foldable light boxes save space and make your setup easier. Always measure your space before you buy.
This guide gives you what you need to pick a light box that fits your style, budget, and space. When you know what you want, you make better choices and get better pictures.
What Is a Light Box for Photography?
Light Box Basics
A light box is a simple tool that can make your photos look amazing. You use it as a mini photo studio, especially when you want to take pictures of products, food, or tiny objects. The main job of a light box is to give you soft, even lighting. This helps you avoid harsh shadows and bright spots that can ruin a good shot.
Here’s a quick look at what makes up a typical LED light box:
Feature | Description |
|---|---|
Definition | A light box is a device for shadowless photography, often used as a mini photo studio for products. |
Structure | Usually a small cube or rectangle with white or clear walls. |
Function | Spreads light evenly from all sides, so you can shoot from different angles. |
Advantages | Gets rid of shadows and glare, gives soft light, and makes your subject stand out. |
Most light boxes have a platform and three sides, plus a roof. The inside is covered with smooth, white material. This bounces the light around and makes everything look bright and clear. Many light boxes use LED lights because they are bright, cool, and energy-saving. You can find boxes in different sizes, so you can pick one that fits your space and your subject.
Why Use a Light Box?
You might wonder why you need a light box. The answer is simple: it makes your photos look professional with less effort. Here are some reasons you’ll love using one:
You get soft, diffused lighting that cuts out harsh shadows.
Your photos look clean and sharp, which is great for selling products online.
You can see how the light looks before you take the picture, so you spend less time fixing things later.
It helps you show off colors and textures, making your items more appealing.
You save time because you don’t have to redo your setup for every shot.
Tip: If you want your photos to look natural and eye-catching, a light box is one of the best tools you can use. It gives you control over your lighting and helps you get the results you want every time.
Essential Features of the Best Light Box for Photography
Size and Shooting Area
Picking the right size light box is important. You need a box that fits your biggest item with extra space. If you take pictures of big things, get a larger box. Small boxes are good for jewelry or coins. The size and shape decide what you can photograph. Measure your space before you buy. This makes setup easy and helps you get great photos.
Tip: Always check the inside size before buying. This helps you plan and stops surprises.
Diffused, Adjustable LED Lighting
Lighting is the most important part of a light box. You need diffused, adjustable led lighting for soft light. This helps you avoid harsh shadows and shows details. Adjustable lights let you control how soft or strong the light is. You can move the light to different spots. This helps you show off special parts of your product. Here’s why these lights are important:
Diffused lighting gives soft light and less shadows.
Adjustable lights let you change the look for each item.
You can point the light to highlight details.
If you want easy control and great photos, pick a box with these lights.
Brightness and Color Temperature
You want your photos to look real. That means you need a light box with adjustable brightness and color temperature. These settings help you match the light to your product. You can make the light warmer or cooler. You can turn up the brightness for shiny things. This makes it easy to get the best results. Look at this table to see how these features help:
Feature | Why It Matters |
|---|---|
Brightness and Color Temperature | Makes colors look real and reduces glare. |
Calibration | Change your camera settings after changing brightness and color temperature. |
Adjustable Color Temperatures | Lets you create different moods, from warm to cool (3000K to 6000K). |
If you want easy editing and great photos, pick a box with these controls.
Build Quality and Materials
A good light box lasts longer and works better. You want strong materials like aluminum, acrylic, or polycarbonate. Aluminum is light, does not rust, and is strong. Acrylic sheets are clear and tough. Some boxes use plywood or metal for extra support. These materials make your box easy to move and keep it steady. If you want easy use and great photos, choose a box made with these materials.
Material | Properties |
|---|---|
Aluminum | Lightweight, rust-resistant, strong |
Acrylic Sheets | Clear, durable |
Plywood/Metal | Adds support and stability |
Seamless White Backdrops
A seamless white backdrop is very important for photos. It gives you a clean space with no distractions. Your product stands out and looks professional. Many online stores want pure white backgrounds. This makes your box easy to use for selling online. Here’s why white backdrops matter:
They make your product stand out.
They help your shop look professional.
They meet online selling rules.
If you want easy editing and great photos, always use a seamless white backdrop.
Extra Features (Lighting Modes, Reflectors)
Some boxes come with cool extras. You might get lighting modes, reflectors, or color adjustment. These features make taking photos easy and fun. Lighting modes let you try different effects. Reflectors make the light better and your product shine. Some boxes let you adjust color to match your camera. You might even find boxes with Ethernet control for advanced setups. Here’s a quick look at what you can get:
Feature | What It Does |
|---|---|
Lighting Modes | Lets you pick effects, dimming curves, and high-speed options |
Reflectors | Improves light quality and performance |
Color Temperature Range | Adjusts from 2,800K to 10,000K for perfect lighting |
Color Adjustment | Full RGBWW and tint correction |
Bi-Color Range | Offers 2700K~6500K for more choices |
Output | Gives strong light for big products |
Connectivity | Ethernet for easy advanced control |
If you want easy creative control, look for these extras in your box.
Price and Value
You want a light box that fits your budget and gives good value. The price depends on features, build, and design. Expensive boxes often have waterproof ratings and energy-saving lights. These extras make your setup easy and add value. Buying in bulk can save money. The market for boxes is growing fast, with new designs and better energy use. This makes it easy to find a box that fits your needs and budget.
Note: Paying a bit more for a good box can save you time and money later. You get easy setup, better strength, and great photos.
When you shop for a box, focus on the features you need. This makes taking photos easy and helps you get the results you want.
Comparing Top Lightbox Models
Best Overall Light Box for Photography
You want the best light box for photography that checks all the boxes. Look for models with strong, adjustable LED lights, flexible color temperature, and the ability to use modifiers. These features help you get the right look for any subject. Here’s a quick table to help you spot the top qualities:
Criteria | Description |
|---|---|
Light Intensity | Adjustable LEDs, at least 1000 bulbs for flexibility |
Color Temperature | Lets you change the mood and match your camera |
Use of Modifiers | Helps you shape the light for better product photos |
Many photographers love the Godox SL60IIBI for its power and control. It works well for both beginners and pros.
Best Budget Light Box
If you want the best budget option, you can try the Soonwell FB-21 or Falconeyes RX18-TD. Both give you great value without breaking the bank.
Light Model | Pros | Cons |
|---|---|---|
Soonwell FB-21 | Very portable, adjustable, cool to the touch | Not for large rooms or group shots |
Falconeyes RX18-TD | Soft light, easy setup, strong enough for groups | Bag and controller are not as nice, size may be too big for some |
You get a lot for your money with these models. They are the best for beginners and anyone who wants to save.
Best Portable Photo Studio Lightbox
You need the best portable photo studio lightbox if you shoot in different places. The Glendan Portable Photo Light Box stands out as the best on-the-go studio box. It folds up small, sets up fast, and gives you bright, even light. This is the best compact design for travel or small spaces.
Best for Product Photography
For product shots, you want the best light boxes for photography with continuous LED panels. These panels stay cool and save energy. Non-reflective backdrops like velvet or matte plastic help you avoid glare. Integrated LED boxes make setup quick. You get an excellent tool for product photography that makes your items look sharp and true to color.
Best for Food Photography
Food photos need special features. The best light box for photography in this area gives you variable diffusion, light falloff control, and multi-source integration. You can create soft shadows and highlight textures. Here’s a table to show what sets these boxes apart:
Feature | Best LED Light Box | Standard Light Box |
|---|---|---|
Variable Diffusion Distance | Yes | No |
Light Falloff Control | Yes | No |
Multi-Source Integration | Yes | No |
Asymmetrical Lighting Ratios | Yes | No |
Separation Lighting | Yes | No |
You get more control and better results with these features.
Best for Macro Photography
Macro shots need steady, bright light. The best light boxes for photography in this area use continuous lighting. You can control the direction and intensity, so you never wash out colors or scare tiny subjects. Color control helps you get smooth, daylight-like photos. This is the best for small products and detail work.
Other Recommended Models
You have many choices for a photo light box. Here are some other top picks for different needs:
Kaiser Slimlite Plano Lightbox
Huion L4S LED Lightbox
Artograph LightPad
Glendan Portable Photo Light Box
LimoStudio Table Top Photo Light Box
Torjim Soft Box
Skytex Soft Box
NEEWER Soft Box
RALENO Soft Box
Godox SL60IIBI & COLBOR Studio Lights
Tip: Always check reviews and see what other users say before you buy. Real feedback helps you find the best light box for photography that fits your style.
Matching Light Box Features to Your Photography
Product Photography
When you want to take product photography, you need a light box that gives you control over shadows and light direction. You can use led light boxes to get a clean look and show off your items. Many ready-made light boxes make setup easy for beginners. If you like to customize, you can build your own to fit bigger products or match your style. Here are some things to look for:
A light box with adjustable lights helps you change the look of your product.
You get better image quality when you can move the lights and change the background.
Led light boxes let you work faster and get sharp, bright photos.
Food Photography
Food looks best when you use a light box with soft, even lighting. You want to show color and texture. Led light boxes with adjustable brightness and color temperature help you match the mood. You can use a compact light box for small dishes or a foldable light box for bigger setups. Try different backgrounds to make your food pop. If you want to know how to choose light box for photography, pick one that lets you change the light and background easily.
Macro and Detail Shots
Macro shots need special lighting. You work close to your subject, so natural light is not enough. A light box with reflectors and diffusers helps you control shadows and highlights. You can use ring lights or small led light boxes for even lighting. This setup gives you the quality you need for tiny details. If you want to know how to choose light box for photography, look for one with good color accuracy and brightness control.
Studio vs. On-the-Go Use
You might need a studio setup or a compact, portable light box. Here’s a quick table to help you compare:
Feature | Studio LED Light Boxes | Portable LED Light Boxes |
|---|---|---|
Setup | Needs assembly and space | Quick setup, collapsible |
Portability | Not portable | Fits in a carry case |
Lighting Quality | Professional studio lighting | Optimized for handheld use |
Use Case | Professional photography | Hobbyists, travel, on-the-go |
Design | Larger, complex | Simple, user-friendly |
Background Options | Studio backgrounds | Easy to attach various backgrounds |
Time to Setup | Longer | Less than one minute |
If you travel or work in small spaces, a compact or foldable light box saves time and space. You get the benefits of led light boxes wherever you go. Always check the quality of the lights and the build before you buy.
Tip: Match your light box features to your style and environment. You get better results and enjoy your photography more.
Troubleshooting and Tips
Fixing Uneven Lighting
You might notice some spots in your photos look brighter than others. This happens when the LED strips inside your light box are not lined up right or the diffuser does not spread the light evenly. Sometimes, a faulty LED can cause problems, too. Here’s a quick table to help you spot and fix common lighting issues:
Problem | Causes | Solutions |
|---|---|---|
Uneven Lighting or Hotspots | LED alignment, weak diffusion, bad LEDs | Move LED strips, upgrade diffuser, replace LEDs |
Flickering Lights | Weak power supply, wrong drivers | Use stable power, upgrade drivers |
Premature LED Failure | Overheating, loose wires, cheap LEDs | Improve airflow, check wires, use better LEDs |
If you see uneven lighting, try moving the LED strips or adding a better diffuser. For flickering, check your power supply. Replace any broken LEDs to keep your photos looking sharp.
Tip: Always test your light box before a big shoot. You can catch problems early and save time.
Choosing and Using Backdrops
Backdrops make your photos look clean and professional. You want a seamless white backdrop for most product shots. If you want to add style, try colored or textured backgrounds. Make sure your backdrop fits flat and does not wrinkle. Wrinkles can cause shadows and distract from your subject.
Use white for a classic look.
Try black for dramatic shots.
Pick colors that match your product.
Change backdrops often to keep them fresh. Clean them if you see dust or stains.
Pro Tip: Store your backdrops rolled up to avoid creases.
Maintenance and Longevity
Taking care of your light box helps it last longer. You should clean the surfaces when they get dirty. Check the vents and wires every week. Look inside once a month for dust or loose parts. Do a deep clean monthly and a full check every three months. Replace old parts and calibrate the lights once a year.
Maintenance Task | How Often |
|---|---|
Surface Cleaning | As needed |
Ventilation Check | Weekly |
Electrical Check | Weekly |
Internal Inspection | Monthly |
Deep Cleaning | Monthly |
Full Check | Quarterly |
Replace Parts | Annually |
Calibration | Annually |
If you follow these steps, your light box will stay bright and reliable. You get better photos and save money in the long run.
You’ve learned how to pick the best LED light box for your photography. Focus on adjustable lighting, the right size, and seamless backdrops. Make a checklist with your must-have features. Compare models and read reviews before you buy. Matching your needs to the right light box helps you get sharp, professional photos every time.
Tip: Take your time and test a few options if you can. The perfect light box makes your setup easy and your photos stand out.
FAQ
How do you clean a lightbox?
You can wipe the inside of your lightbox with a soft, dry cloth. For tough spots, use a damp cloth. Avoid harsh cleaners. Dust the LED strips gently. Keep your lightbox clean for the best photos.
Can you use a lightbox for phone photography?
Yes, you can use a lightbox with your phone. Place your phone on a tripod or hold it steady. The lightbox gives you even lighting. You get sharp, bright photos without fancy cameras.
What size lightbox should you choose?
Pick a lightbox that fits your largest item with extra space around it. Measure your products first. A small lightbox works for jewelry. A bigger lightbox helps with shoes or bags. You want room to move your camera.
Why does your lightbox have uneven lighting?
Uneven lighting happens when the LED strips shift or the diffuser gets dirty. Check your lightbox for dust or loose parts. Move the lights if needed. Clean the diffuser. You want soft, even light for every photo.
Can you change backdrops in a lightbox?
Most lightbox models let you swap backdrops. You can use white, black, or colored backgrounds. Change them to match your product. Make sure the backdrop fits flat. A wrinkled backdrop can ruin your shot.
See Also
Selecting The Ideal Wall Mount For Your LED Light Box
Essential Guide To LED Sign Boxes: Specs, Setup, And Profit
Selecting The Best Acrylic Panels For Your Light Box Displays
